macOS Monterey cannot be installed on Macintosh HD
macOS Monterey cannot be installed on Macintosh HD is a Mac error that some users have experienced when trying to update to the latest macOS release. The macOS Monterey cannot be installed on Macintosh HD error prevents the installation of macOS Monterey.
Updating to a new version of macOS always has the potential to have some hurdles along the way, and the case with macOS Monterey is no different. If you’ve recently tried to update to this latest macOS release only to be met with the “macOS Monterey cannot be installed on Macintosh HD” message, then know that this is nothing surprising and, in most cases, there should be an easy fix for it.
There could be numerous causes for the appearance of this error – for instance, there could be a bug in Monterey that would be patched out with the next update of the macOS, but it’s also possible that a problem with your Internet connection or your hard drive is triggering the error message. It’s also worth noting that if you are using a bootable USB drive to perform the installation of Monterey, a problem with the drive (for instance, the drive isn’t formatted correctly) could also be the cause for this problem.
There are quite a few methods that you can try in order to troubleshoot this problem, and we will explain in detail the ones that are most likely to help you. However, before you attempt any of the methods, it’s always a good idea to back up your data, so that you don’t accidentally lose any important files. Although the methods suggested below shouldn’t put your data at risk of getting lost, it’s better to be safe than sorry. Here is our guide on how to back up your Mac’s data – go ahead and use it if your important files haven’t already been backed up.
macOS Monterey cannot be installed on macintosh HD fix
The macOS Monterey cannot be installed on Macintosh HD fix methods are using Safe Mode, Disk Utility, or Recovery Mode. If nothing works, the ultimate macOS Monterey cannot be installed on Macintosh HD fix is to erase your Mac and perform a clean install. Also, we have added additional updated instructions.
Below, you will see detailed instructions for each of those methods – we suggest trying them out in the order they are shown, as we’ve organized them starting with the easier ones and moving on to the more complex and time-consuming methods.
Also, there are several things that you should check before trying anything else:
- Check your Internet connection and make another attempt to install macOS Monterey. If you are trying to install macOS Monterey from the Internet (Apple’s servers), then a problem with your connection may be the reason for this error. The easiest way to do this is to connect to your network from your Mac or another device, Google “check Internet connection” and use one of the numerous testing sites to check the connection’s speed and stability. If there are any issues with it, this should become apparent after the test.
- Make sure that your USB drive is formatted correctly. If you are installing macOS Monterey from a bootable USB drive, then that USB must have been created with the correct format. To check what the USB drive’s format is, plug it into your Mac, open the Finder, right-click the USB drive icon in the panel to the left, and select Get Info. In the small window that shows up, you will see information about the drive’s format. The correct format that the USB drive needs to be in order to allow you to perform the macOS installation is Mac OS Extended (Journaled). If that’s not its format, you will need to use the Disk Utility app to reformat it in the correct format and then use the Terminal to download the macOS Monterey installation file on it to make it bootable.
- Check macOS Monterey compatibility with your Mac’s model – it’s well known that with each newer macOS release, more and more Mac models are getting left out of the pool of models supported by the latest macOS. Monterey is no exception, and so if you have an older Mac model, it is possible that Monterey simply doesn’t support it. Below is a list of the Mac models that can update to Monterey – if your Mac isn’t among them, there isn’t an official way to get this latest OS. However, there may be a workaround method that you can use to still get Monterey if you really want to.
- iMac (late 2015 and later)
- MacBook Air (early 2015 and later)
- iMac Pro (2017 and later)
- MacBook Pro (Early 2015 and later)
- Mac mini (late 2014 and later)
- MacBook (early 2016 and later)
- Mac Pro (Late 2013 and later)
- Check your Firewall settings – if your Mac’s Firewall uses restrictive settings, this may be what’s blocking the Monterey installation. Go to Apple Menu > System Preferences > Security & Privacy > Firewall, and open the Firewall options (you may first need to click the Padlock to unlock the Firewall options). If there you see that the Block all incoming connections option is enabled, you need to uncheck it and enable the Automatically allow built-in software to receive incoming connections option. After this, click OK to save the changes to the Firewall settings.
- Lastly, it’s possible that your Mac simply lacks the storage space to accommodate the Monterey installation. Your Mac needs to have at least 20 GB of free space on its drive (preferably more) for Monterey to be installed on it. If you don’t have this much space, try deleting some files and then attempt to perform the installation again.
If none of those potential causes is what is triggering the error in your case, then proceed with the troubleshooting methods shown below:
Install macOS Monterey in Safe Mode
What you need to do here is simply restart your Mac in Safe Mode and try to perform the installation again. Depending on whether you are using an Intel Mac or an M1 Mac, the process of restarting in Safe Mode varies a bit.
Instructions for Intel Macs
- Shut down your Mac, press its Power button, and immediately press and hold Shift.
- Release the button once you see your Mac’s login screen.
- Log in to your Mac as normal – you may be asked to log in a second time. If you’ve successfully entered Safe Mode, you should see “Safe Boot” written in the top-right of either of the login screens. If you don’t see it, try again.

- Once in Safe Mode, try once again to install macOS Monterey.
M1 Macs Fix
- Start with your Mac turned off and press and hold its Power button – release it once you see the Startup Options screen.
- Select your Mac’s startup disk, then hold down the Shift button, and click on Continue in Safe Mode.
- Log in to your Mac, and if asked to, log in a second time. Once you’ve entered Safe Mode, you can try the macOS Monterey installation again.
Repair your Mac’s disk
The second thing you can try is to repair the disk from which your Mac starts and then try again to install macOS Monterey:
- Shut down your Mac and do either of the following:
- Intel-based Macs: turn on the computer and immediately press and hold Command + R until you get to an Apple logo screen.
- M1 Macs: with the Mac turned off, press and hold its Power button. Release the button when you see the Startup Options screen, select the Options icon, and click Continue.
- If asked to, select a user profile for which you know the password, click Next, and enter its password.
- Select Disk Utility in the Utilities screen.
- In Disk Utility, select View from the top and then click on Show All Devices.
- Now you must repair each volume, container, and disk (shown in the left sidebar) in this order: always start with the volumes first and end with the disks. The volumes are the ones shown at the bottom level of the hierarchy tree.
Click the last volume of the last container of the disk you are repairing, then select First Aid from the top, and then select Run/Repair. - After repairing the first volume, do the same thing with the other volumes, then with their containers, and finally repair the disks (again, in this last to first order).
- Once you’ve run the repair process on all volumes, containers, and disks, close the Disk Utility, click on the Apple Menu, and select Restart.
- When your Mac restarts, attempt the installation of Monterey one more time to see if it works now.
Install Monterey from macOS Recovery Mode
You can also use the Recovery Mode of your Mac to perform the installation of Monterey.
- Perform steps 1 and 2 from the previous method to get to the macOS Recovery Mode screen.
- Select the Reinstall macOS option and click Continue.
- Follow the on-screen prompts to complete the installation. Take note of the following guidelines:
- If you are required to first unlock your Mac’s disk, enter your password to unlock it.
- If the installer cannot find your Mac’s disk or tells you that it cannot install macOS Monterey on the disk, you will likely first need to erase your Mac (see below).
- If you are given the option to choose between Macintosh HD and Macintosh HD – Data, choose the former.
- Do not turn off or put to sleep your Mac until the installation finishes. Also, if you are using a MacBook, make sure that it is connected to a power source to avoid the risk of it accidentally running out of battery juice and shutting down.
- Do not close the MacBook’s lid until the installation finishes.
- After the installation is over, you might get to a setup screen. If you are selling or giving away your Mac, press Command + Q to quit it and thus allow its future owner to set it up themselves.
macOS Monterey cannot be installed on macintosh hd updated fix
Update the current macOS release to the latest version
In addition to releasing a new major macOS version every year, Apple also releases smaller updates for its latest macOS versions, and it’s advisable to install those updates as they often fix different problems in the macOS. Therefore, we recommend that you try updating your current macOS and then attempting again to upgrade to macOS Monterey.
- Go to Apple Menu > System Preferences > Software Update.
- See if there’s an update available for your current macOS version. For instance, if you are currently using macOS Big Sur and its version is 11.6.8, you should see the option to update it to 11.7, as that is the current latest Big Sur version.
- If you only see the option to update to Monterey, click on More info, and you should be able to see all available updates.
- Now select the latest update for your current macOS, click Install Now, wait for the installation, and then restart your Mac.
Install from the App Store
If you’ve been trying to upgrade to macOS Monterey using a bootable USB, we recommend trying to install Monterey from the App Store instead, if you have the option to do that. It’s easier and more streamlined, and there are fewer potential issues that can occur.
- Open the Applications folder and launch the App Store.
- Search for “macOS Monterey” and click on the operating system when it’s found.
- Click Get to download the installation file and wait for it to download.
- Once Monterey downloads, launch its file and follow the prompts to complete the installation.
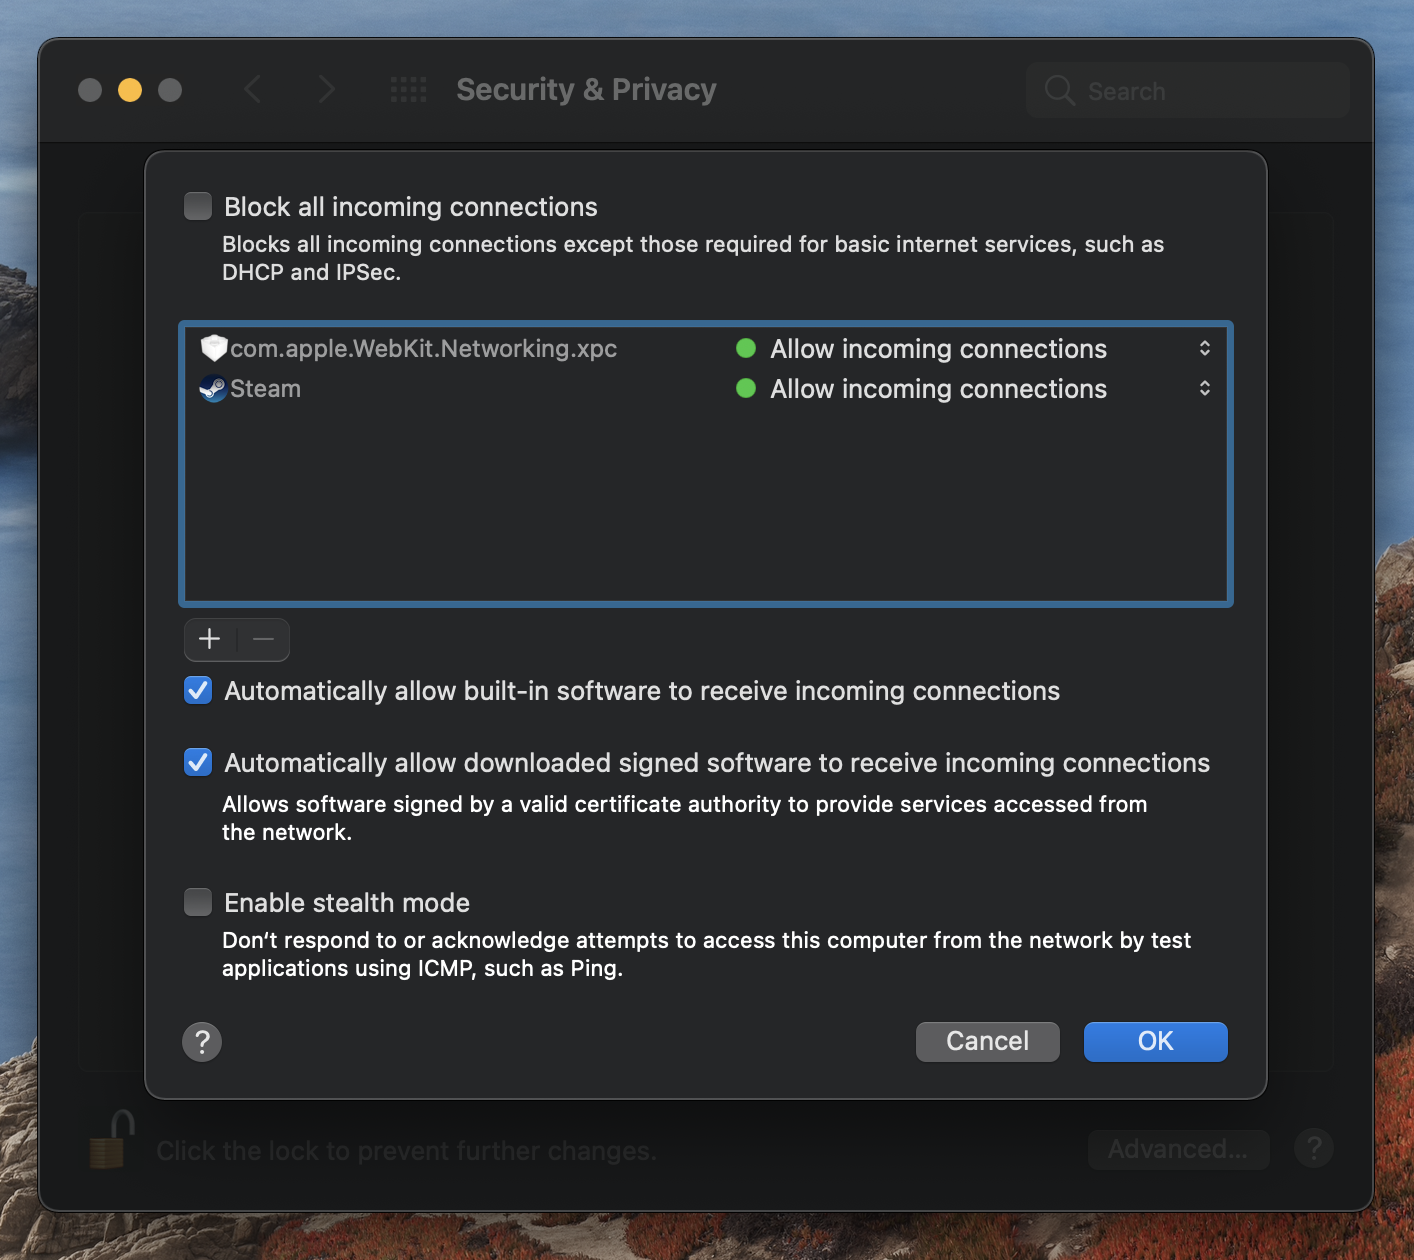
Check Firewall settings (external drive installations only)
If you are attempting to install macOS Monterey from an external drive, then the settings of your Firewall may be preventing you from doing that. Here’s what we recommend doing:
- Go to System Preferences from the Apple Menu, and open Security & Privacy.
- Select the Firewall tab, click the Padlock icon, and enter the password for your Mac to unlock those settings.
- Then select Firewall options, and uncheck the Block all incoming connections option if it’s currently checked.
- Next, make sure that both of the following settings are enabled:
- Automatically allow built-in software to receive incoming connections
- Automatically allow downloaded signed software to receive incoming connections
- Click OK, close everything, and try to install Monterey once again.
- If you are still facing issues, go back to Security & Privacy > Firewall, and click on Turn Off Firewall.
- Now try again the Monterey installation from your bootable USB. If the issue persists, then it’s not caused by your Firewall.
Change Startup Security Settings (external drive installations only)
M1 Macs and Macs that have T2 security chips are set by default to not allow booting from external drives, so if you are failing to install Monterey from a bootable USB, this could be the reason.
- While holding down the Option key, click the Apple Menu and then select System Information.
- Next, click Controller or iBridge (whichever of the two is available) in the left panel.
- Now, look at the right panel – if there you see Apple T2 chip or M1 chip, then proceed to the next steps.
- Enter Recovery Mode, click Utilities from the top, and select Startup Security Utility.
- Next, check the Medium Security setting and the Allow booting from external or removable media options.
- Close the Startup Security Utility, restart the computer, and try the macOS Monterey installation again.
Erase your Mac
This final method should only be used as a last resort option in case the previous suggestions shown here didn’t allow you to install macOS Monterey on your Mac. Note that erasing/wiping clean your Mac would result in the deletion of all personal data that you have stored on it. For this reason, we once again remind you to back up your Mac before you proceed with this method. If you’ve already done that, or you don’t care about losing any of your data, you can proceed to our How to completely wipe a Mac guide, where you can find detailed instructions on erasing your Mac’s disk.
After you’ve erased your Mac, you can use the Install Monterey from the macOS Recovery Mode method that’s shown above to perform a clean install of the latest macOS.
Leave a Reply