FIFA 21 On Mac Explained
To play FIFA on Mac, you need to find a workaround solution to the problem that is the lack of a macOS version of most FIFA games, including FIFA 21. Installing Windows on your Mac is a possible way to play FIFA on Mac.
With the steady improvement in the hardware characteristics in newer Mac models and with the recent release of the Apple M1 chip that significantly increases the CPU power of Mac models that have it, playing computer games on Mac machines isn’t as rare as it used to be. Of course, it’s true that Macs are optimized for other things and not for gaming, but the option to casually play even some of the newer and more demanding games on a Mac is still there.
Editors’ Choice: Play Genshin Impact on Mac
However, one problem that still exists when it comes to gaming on a Mac is the small number of games that have a version for the macOS system. Most games have versions for PC and the various types of consoles, but not Mac. The FIFA series is one example of games that don’t support macOS. There were some FIFA games in the past that had macOS versions, but nothing after FIFA 12 can officially be played on a Mac.
What do you know about playing Fifa 21 on Mac?
Still, if you want to play the latest FIFA game – FIFA 21 – or any other game from this series on your Mac, you may still be able to do that in a roundabout way – by installing Windows 10 on your Mac and then installing FIFA on the Windows partition of the computer. Though it may sound a bit complicated, the process is actually quite streamlined and not difficult to complete. You just need to make sure that you have some time to spend setting everything up because there are several things that need to be installed, and those installations could take quite a bit of your free time.
We will show you how to correctly do everything, but you must first make sure that your Mac is up to the task of running the FIFA game you want to play. Each year’s FIFA game has different system requirements, but in general, those games aren’t too demanding compared to others that have come out in the same year. Still, FIFA 21, the latest of the series, does have some rather high requirements that some Macs may struggle to meet.
system requirements of FIFA 21:
- CPU: Athlon X4 880K / Core i3-6100 or better.
- RAM: 8 GB.
- OS: Windows 7/8.1/10 64-Bit.
- VIDEO CARD: Radeon HD 7850 or better/GeForce GTX 660 or better.
- At least 50 GB of free disk space
Note: The game needs you to have 50 GB of free space, but since you will also be installing Windows 10, which takes up 64 GB, and since it’s recommended to leave some free space in both your macOS and Windows 10 partitions, we recommend that you only proceed with the steps below if you have a minimum of 200 GB free space on your Mac (preferably more).
FIFA 21 Set Up Methods
| Methods | Advantage | Disadvantage |
| Cloud Gaming | – No set-up required – Register and Play – Access to a Library of over 70 top-rated free Games – Smooth performance – Compatible with M1 and Intel Macs |
– Monthly Fee – Requires Decent Internet Connection – No Free Trial |
| BootCamp | – Free to use any time – Windows 10 Environment |
– Painful Setup – Mediocre Performance – Only Compatible with Intel Macs |
| Parallels Virtual Machine | – Easy Set-up – Adequate Performance – Play almost any PC game – Windows 11 environment – Compatible with M1 and Intel Macs – 14-day free trial |
– Yearly Fee |
FIFA 21 with Cloud Gaming
FIFA 21 is now available to play on cloud gaming servers. This assures NO
compatibility issues while playing on your Mac as well as top-notch performance.
Step 1. Get FIFA 21
Before playing FIFA 21 make sure you get the game through the official websites. For the moment only Steam and Origin are compatible with cloud gaming services such as Boosteriod and Geforce.
Update: Limited time offer now available at CDkeys.com, buy FIFA 21 for $46.39 (Origin Launcher)
Step 2. Register and Add FIFA 21 To Boosteroid Cloud Gaming Library
All you need to do now is register for Boosteroid. This allows you to add FIFA 21 to their Cloud Gaming Library. Once uploaded you can seamlessly play the game from your Mac, TV or Mobile Device.
When Registered you will have additional access to more than 70 top-rated games for free. Pricing varies depending on the subscription plan.
How to play FIFA 21 on Mac with Boot Camp
To play FIFA on Mac, you can install Windows 10 on your Mac using the Boot Camp Assistant app. Then, to play FIFA on Mac, all you need to do is download the game as you would on a regular Windows PC.
How to install Windows 10 on Mac using Boot Camp Assistant
Step 1
Open your preferred browser, and search for Windows 10 download in Google (or another reliable search engine site). Then select the first result – it should be a download page for Windows 10 from the official Microsoft site.
Next, select the Windows 10 edition that you prefer – we recommend that you go with the regular Windows 10 install. After choosing an edition, click the Confirm option.
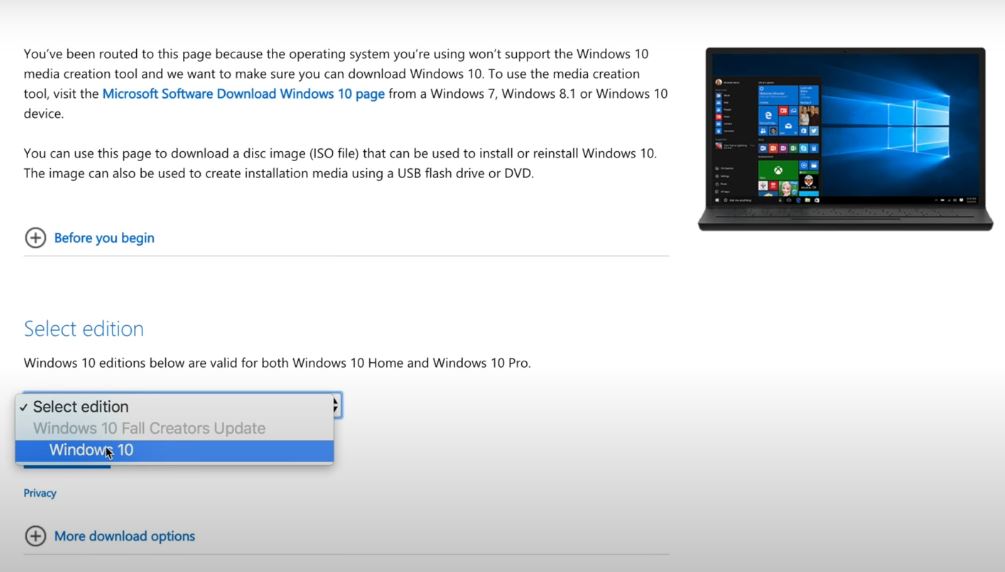
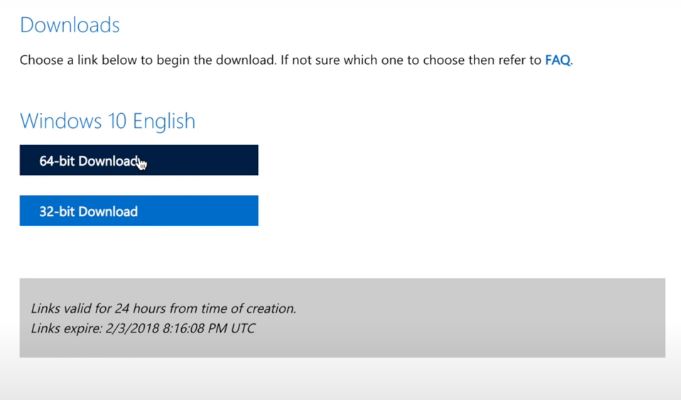
Now, select a language, select the Confirm button again, and, on the next page, choose the 64-bit version of the OS and select a location on your Mac where the ISO file for Windows 10 will be saved. If your browser doesn’t ask you to choose a location, the file will most probably get automatically downloaded to the Downloads folder.
Step 2
Now you must go to the Boot Camp Assistant app – to find it, open Finder, go to the Applications folder and then open Utilities. There, find and double-click on the Boot Camp Assistant icon and click Continue when it opens.
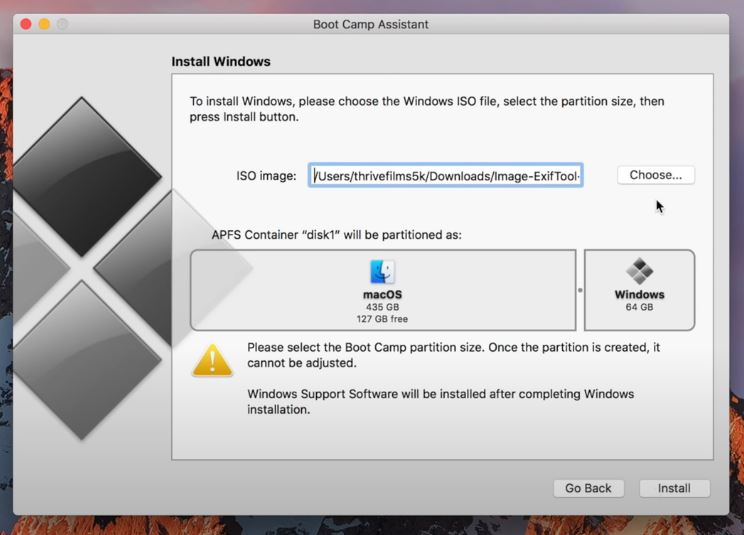
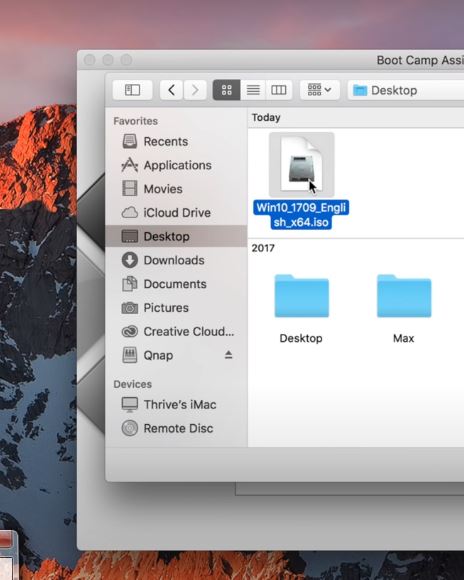
Next, click on the Choose button, find the ISO image that you downloaded, select it, and click Open.
Now you must choose how much disk space you want to assign to the Windows 10 partition. The OS itself takes up around 64 GB of space, but it’s always good to give it at least 40-50 GB of extra space, or else there will likely be performance issues. However, since you will also be installing a rather sizeable game on your Mac, you should probably add at least another 50 GB for good measure. In total, we recommend that you give the Windows 10 partition no less than 150 to 200 GB of free space. Still, you must also make sure that you leave enough space for your macOS partition, so use your own discretion to determine how to best distribute the hard disk space between the two partitions.
Once you are done distributing storage space between the partitions, click Install, and be prepared to wait for some time – your Mac will need to prepare for the installation. Once it’s ready, it will ask you to type in your password (the one you use to log into your Mac account), so type it in and click on OK. The computer will restart after that.
Step 3
When the Mac restarts, the Windows logo should appear on your screen and after that, you will be required to select a language and location – choose the language and location that you prefer and click the Next button.
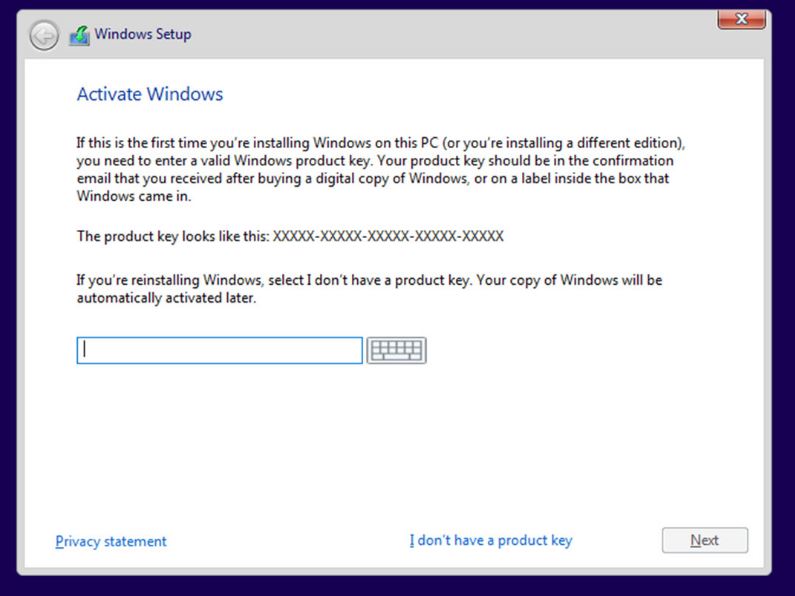
On the following screen, you will be asked to type in your product key for Windows 10. If you have purchased Windows 10 and have such a key, type it in and select Next. If not, skip the step by clicking on the I don’t have a product key option.
- If you are required to pick between the Windows 10 Home version and the Windows 10 Pro one, it’s recommended that you select the former option seeing as how your intention is to use Windows 10 for gaming and you won’t need any of the advanced power-user features that come with Windows 10 Pro, which version is significantly more expensive than the Home one (in case you eventually decide to purchase Windows 10).
Next, click the I Agree button and then click Next – this will initiate the Windows 10 installation, which could take some time to complete. Make sure your Mac is connected to a power outlet so that its battery doesn’t accidentally run out of power and don’t turn off the computer until the process is finished.
Step 4
Once the installation finishes, the computer will restart once again, and a Windows screen will appear, providing you with the option to either customize the settings of Windows 10 or to opt for the Express settings, which are preset settings that may allow certain things that you may prefer to stay disabled. For this reason, we advise you to Customize the Windows 10 settings according to your preferences.
After you are done with this, Windows will require you to create an account by typing in a username and a password. You can skip picking a password and only type a username but we recommend that you don’t skip the password for security reasons.
Next, choose whether you’d like to enable and customize Cortana now or leave it for later.
Step 5
When you are done with everything, Windows 10 will load and the Boot Camp installer will show up on your screen – select the Next button, then click I accept, and after that Next – this will initiate the process of installing drivers that your Mac needs in order to properly work with Windows 10. You will likely see pop-ups during the installation process – click Install on all of them to allow the installation of the specified drivers.
After the drivers’ installation completes, select the Finish button – your Mac will restart again. When the computer boots back into Windows, click the Start Menu in the bottom-left, go to Apple Software Update and wait while Windows is checking for available updates. Once the check completes, select Install if any updates have been found to install them. Again, during the following process, you may be asked for permission to install certain updates, so agree to that by selecting Install if a pop-up appears.
Once the process completes, your Mac will have to restart yet again, so select Yes when asked whether you’d like it to restart now.
When your Mac boots back into Windows, click the Start Menu, then click Update & Security, and select the Windows Update section on the left. Windows will now automatically look for available updates and install them. Once this is done (may take quite some time), you will need to restart your Mac again, so click Restart now.
Step 6
Now that the installation of Windows 10 and all required updates and drivers have been completed, you may want to learn how to switch between the two operating systems that are currently on your Mac.
If you want to go back to macOS from Windows 10, look at the bottom-right corner of the screen and see if there’s a tiny icon that represents a slanted square. If you don’t see it there, then click the small arrow that points up and the square icon should be revealed alongside some other icons. Click on it and select Restart in macOS.
Also, if you are in macOS but want to boot into Windows 10, click the Apple Menu, open System Preferences, and select the Startup Disk option. Next, click the padlock in the bottom-left, type in your password, and select Unlock. After that, select Bootcamp Windows and then select Restart.
Installing FIFA 21 on Mac
Installing FIFA 21 on Mac after you have Windows 10 installed is actually the easiest part of this guide.
Step 1
First, boot into Windows 10 on your Mac and follow this link that will take you to the site of EA Origin and download the Origin app for Windows 10 and not for Mac. EA Origin is a distribution service for games developed by the EA Games company (similar to Valve’s Steam).
Step 2
Open the Origin app and log in with your Origin account if you already have one. If not, create an account now and log into it.
Step 3
Use the origin app to find FIFA 21, purchase the game from the app’s interface, and download it onto your Mac. After you are done with this, you should be able to play FIFA 21 on your Mac as if you were using a Windows 10 PC.
Leave a Reply