Apple’s Game Porting Toolkit is a free compatibility layer tool, based on Wine, which allows Windows-based games to run on Apple computers. It is intended as a developer tool for testing the performance of different games on Mac, so it lacks a user-friendly interface and can be difficult to use for regular users. The Game Porting Toolkit works similarly to CrossOver, another Wine-based compatibility layer, with the main difference being that it provides DirectX 12 support, thus greatly expanding the number of Windows games playable on Mac.
What are the ways to use the Game Porting Toolkit?
On this page, we’ll provide you with detailed instructions on two ways to set up and use the Game Porting Toolkit.
- The first and easier method employs a free 3d party app called Whisky, which simplifies the entire process by providing GPTK with a user-friendly GUI (graphical user interface). This option is recommended for less experienced users, who aren’t used to working with Terminal commands.
- The second (and default) option is to manually set up GPTK with the help of Terminal commands. This method is more advanced and is only recommended for users who know their way around Apple’s Terminal. Opting for this allows for more manual customization, but is significantly more confusing and most users won’t benefit from using it.
- There’s also a third way to use the Game Porting Toolkit and it is to combine it with the aforementioned CrossOver app with the help of a free tool called CXPatcher. This is by far the most user-friendly option and it has some added benefits, such as better stability and fewer bugs. For this option, we have a separate guide, which you can find on our CrossOver tutorial page linked below.
How to set up and use the Game Porting Toolkit
Below are our guides for the two aforementioned ways to set up and use the Game Porting Toolkit. First, we’ll show you how to use the Whisky GUI wrapper to set up GPTK and then we’ll dive into the lenghtier process of doing the same thing, but manually, with the use of Terminal commmands.
Game Porting Toolkit macOS Sonoma upgrade
Regardless of which setup method you choose, you must first upgrade your macOS to its latest version – macOS Sonoma. Sonoma is already publicly available so, you simply need to go to your Apple Menu > Preferences > Software Update, and click on the Upgrade Now button.
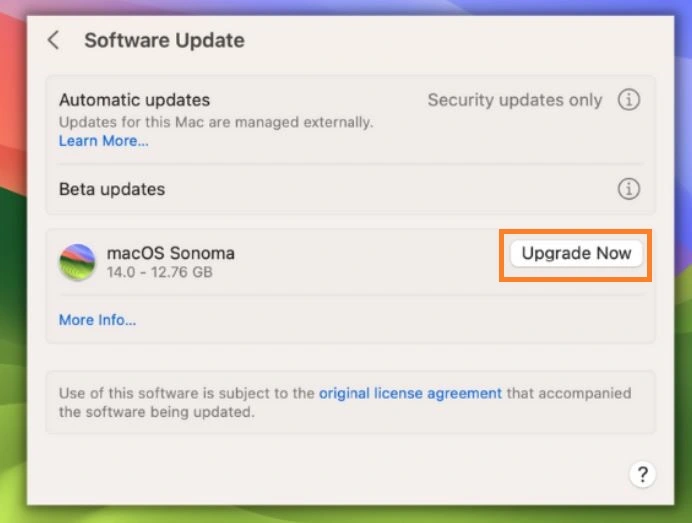
If you don’t see the upgrade option, it either means you are already using Sonoma, in which case you can continue to the next steps, or it means that your Mac is too old and cannot support the latest macOS version. In the latter case, you won’t be able to install and use the Game Porting Toolkit, but you can still game on your Mac using cloud services such as Boosteroid or GeForce Now.
Game Porting Toolkit DMG download
The next thing you need to do is to download the Game Porting Toolkit DMG to your Mac. Head over to the Apple Developer downloads site and log in with your Apple ID; you don’t need a developer account. Search for the Game Porting Toolkit in the search bar, click on ‘View Details’ and download the Game Porting Toolkit DMG. Once downloaded, navigate to the .dmg file, open it, and minimize the folder that shows up.
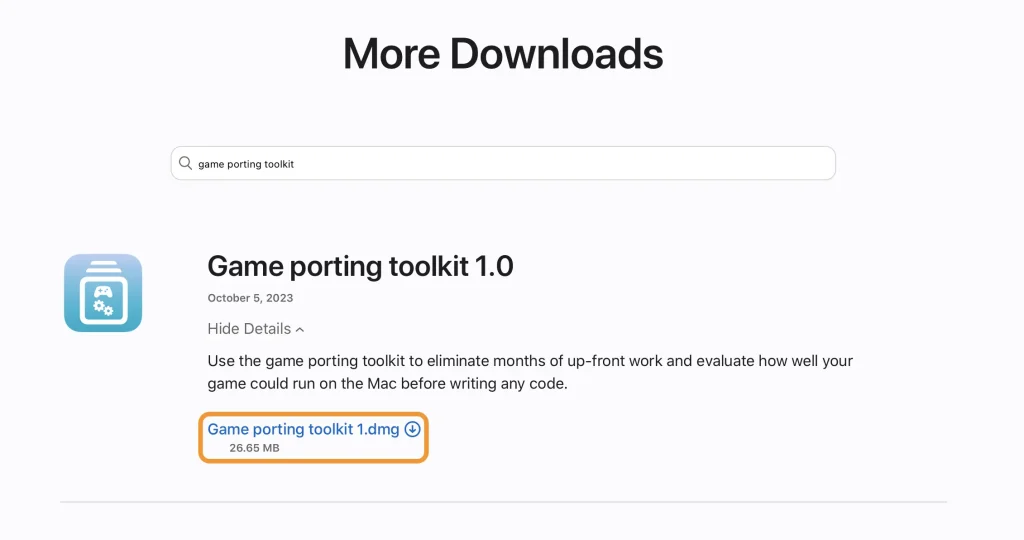
Now, with macOS Sonoma installed and the Game Porting Toolit downloaded, you are ready to start the setup process. Below are our guides for the Whisky setup method and the method that uses Terminal commands.
Whisky Game Porting Toolkit Tutorial
- The first step is to download the Whisky app from this github page. Once there, go to the Assets section under the latest version of the app and click the Whisky.zip file to download it.
- Go to the downloaded Whisky.zip file and double-click it to extract its contents.
- Go to the folder where you downloaded the Whisky ZIP file and extract the file’s contents.
- Next, hold down the Option/Alt key, right-click on the extracted Whisky app and click Open. A dialogue window will appear, where you must click Open once more.
- Next, click on the Move to Applications option, then go to Applications, find the Whisky app and open it.
- Drag-and-drop the Game Porting Toolkit DMG into the Whisky app window – this will install the Game Porting Toolkit into Whisky and you can now start using the translation layer.
- Click the Plus button in the top-right of the Whisky window, give a name to the new Whisky bottle and set its Windows version to Windows 10. Then click Create.
- Download the Windows client for the game store you want to use:
- In Whisky, select the newly-created bottle from the left, and then click Run (bottom-right).
- Navigate to the folder where you downloaded the Steam/Battle.net installation file, select the file, and click Open.
- Follow the installation prompts to install Steam in Whisky. Once the installation completes, log-in to Steam. From there, you can go to your Steam/Battle.net library, install the games you want, and launch them through the Game Porting Toolkit.
Vanilla Game Porting Toolkit Tutorial
Now, if you’ve decided to take the long way around and use only the Toolkit, without the help of CrossOver and the CX Patcher, then you’ll first need to complete the following tasks to get the app ready for use. Once you’ve performed them, we’ll show you how to install your preferred gaming store clients and play your favourite games through them.
Important Notes:
- If your Mac has ARM64 Homebrew installed on it, it’s recommended to remove Homebrew as it’s possible that it may interfere with the next steps. To uninstall it, delete the /opt/homebrew/bin folder or run a Homebrew uninstall script.
- If you have an older Xcode on your Mac, you must uninstall it first.
Install Command Line Tools for Xcode 15
To get the Game Porting Toolkit ready and running, you’ll also need to install Command Line Tools for Xcode 15, so search for ‘Command line beta’ in the Apple Developer downlad page, click on View Details under Command Line Tools for Xcode 15 beta, and then click on the dmg file below the description to download it.
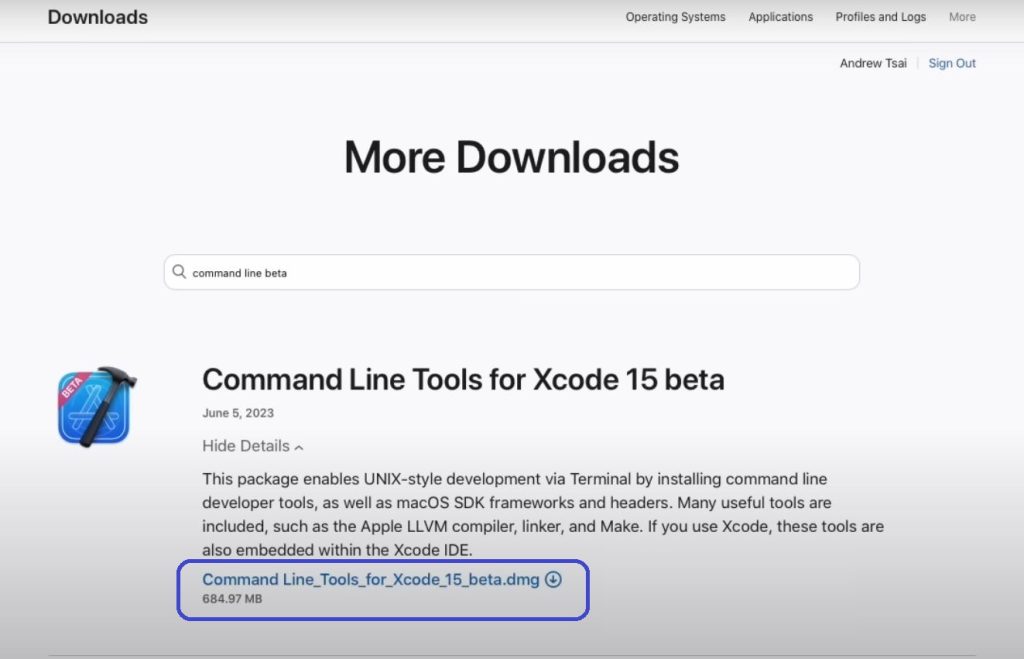
Next, double-click the Command Line Tools .dmg file that you downloaded, then double-click the .pkg file, and follow the prompts to complete the installation. This will get everything ready for the actual Game Porting Toolkit install.
Working with Terminal
Unless you are using the Whisky GUI or CrossOver, the main part of the Game Porting Toolkit installation process involves working with Terminal – your Mac’s command line tool. We’ve provided the commands you’ll need to use, but note that they must be entered in the Terminal exactly as we’ve given them here or else they won’t work. Again, if you want to avoid the need for all this, simply follow our Whisky insrtuctions or go to our CrossOver guide.
To open the Terminal Press Command + Space, type Terminal, and hit Enter. You can also access it by going to Applications > Utilities, where it’s located.
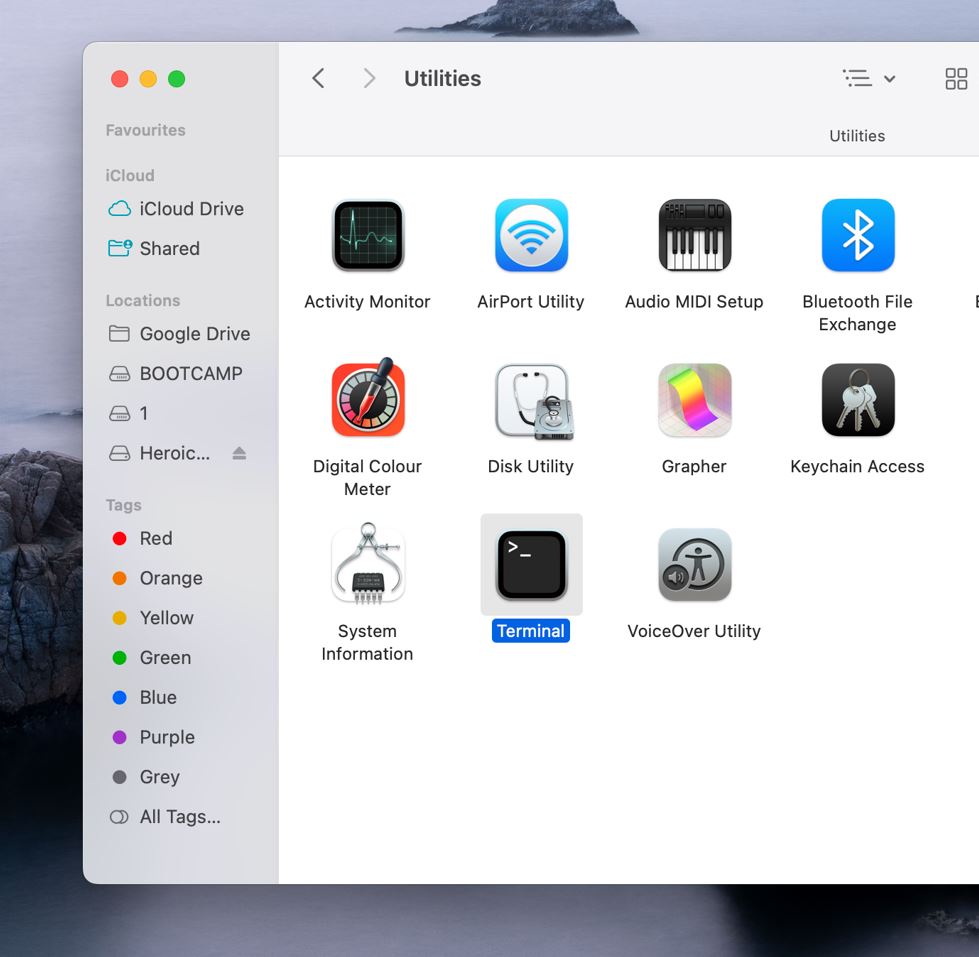
Next, you’ll need to type in a series of commands into the Terminal, hitting Enter after each one in order to prepare the Game Porting Toolkit.
- Some of these commands might ask for your password. When you’re typing it in, you won’t see any characters appear in the Terminal – but don’t let that throw you. Simply type your password as usual, despite the characters being invisible. Once you’ve typed it, hit Enter to affirm and run the command. It might feel a bit like you’re typing into thin air, but trust us – it’s working, and the Game Porting Toolkit is getting ready for use.
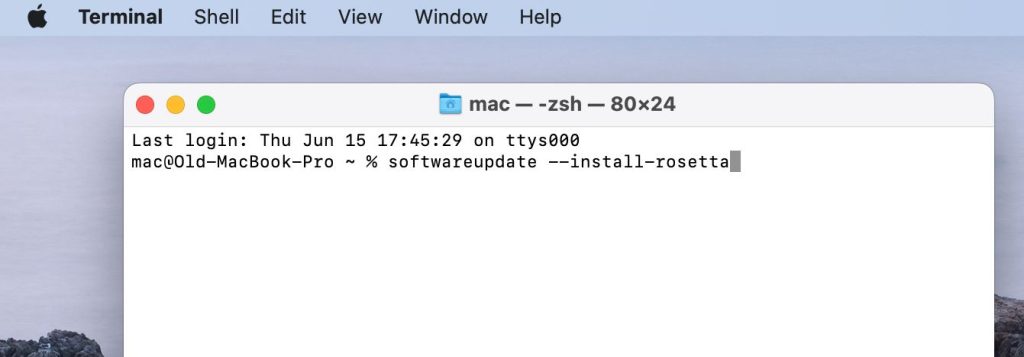
- Rosetta installation (for M1 and M2 Macs only)
- command: softwareupdate –install-rosetta
- Type A and press Enter to agree to the installation.
- Enter the x86_64 shell (needed to perform all the other commands)
- command: arch -x86_64 zsh
- Installing Homebrew x86_64 (requires Admin password)
- command: /bin/bash -c “$(curl -fsSL https://raw.githubusercontent.com/Homebrew/install/HEAD/install.sh)”
- You will need to press Enter a second time to complete the installation.
- Set the correct path:
- command:
(echo; echo ‘eval “$(/usr/local/bin/brew shellenv)”‘) >> /Users/$USER/.zprofile
eval “$(/usr/local/bin/brew shellenv)”
- command:
- Use this command to confirm the chosen path is correct:
- command: which brew
- If you get this as a response /usr/local/bin/brew, it means your path is the correct one. If you get something else, use the following command: export PATH=/usr/local/bin:${PATH}
- Tap the source code from Apple:
- command: brew tap apple/apple http://github.com/apple/homebrew-apple
- Install Homebrew (this installation can take more than an hour and a half to complete):
- command: brew -v install apple/apple/game-porting-toolkit
- (Alternative to Step 7) Updating Homebrew to its latest version if you already have an older version of Homebrew installed:
- command: brew update brew -v install apple/apple/game-porting-toolkit
Note: If this error message “Error: game-porting-toolkit: unknown or unsupported macOS version: :dunno” appears during the Game Porting Toolkit installation process, this signifies that your current Homebrew version lacks compatibility with macOS Sonoma. To rectify this, simply update to the most recent version of Homebrew and perform the installation once more – this time you should be able to set up the Game Porting Toolkit without any hiccups.
Setting up a Wine Prefix
A Game Porting Toolkit Wine prefix acts much like a CrossOver bottle, hosting a virtual C: drive where both the Toolkit and your desired game need to be installed. To create a new Wine prefix in the Game Porting Toolkit and to kick-start the installation of your preferred gaming store and individual games, use the perform the next actions with the specified commands.
- Create a new Game Porting Toolkit Wine prefix.
- command: WINEPREFIX=~/my-game-prefix brew –prefix game-porting-toolkit/bin/wine64 winecfg
- After the command is performed, you should see a Wine Configuration window. In it, you must change the Windows version to Windows 10. Click Apple and OK to save the change.
- Copy the Toolkit’s library directory to the library directory of Wine.
- Note: Before you perform this command, ensure that the Game Porting Toolkit is mounted by opening its .dmg file that you downloaded in Step 2.
- command: ditto /Volumes/Game\ Porting\ Toolkit-1.0/lib/ brew –prefix game-porting-toolkit/lib/
- Place the scripts located in the Game Porting Toolkit DMG into the /usr/local/bin folder.
- command: cp /Volumes/Game\ Porting\ Toolkit/gameportingtoolkit /usr/local/bin
- Update your Wineprefix to a newer Windows build by running the following two commands (run the commands individually, one after the other):
- WINEPREFIX=~/my-game-prefix `brew –prefix game-porting-toolkit`/bin/wine64 reg add ‘HKEY_LOCAL_MACHINE\Software\Microsoft\Windows NT\CurrentVersion’ /v CurrentBuild /t REG_SZ /d 19042 /f
- WINEPREFIX=~/my-game-prefix `brew –prefix game-porting-toolkit`/bin/wine64 reg add ‘HKEY_LOCAL_MACHINE\Software\Microsoft\Windows NT\CurrentVersion’ /v CurrentBuildNumber /t REG_SZ /d 19042 /f
After your Wine Prefix is set up in the Game Porting Toolkit, it’s time to install in it the client for your go-to gaming store. This will allow you to download and install Windows games on your Mac. Follow the instructions below to get Steam, Battle.net, the Epic Games Launcher, or the GOG launcher up and running through the Game Porting Toolkit.
Game Porting Toolkit Steam installation
To perform the Game Porting Toolkit Steam installation, you first need to download the installer for the Windows version of Steam and then use Terminal commands to install it within the toolkit. One thing to note about using Steam with the Game Porting Toolkit is that there’s a bug that causes the client to appear as a blank window which prevents you from accessing your library and installing any of your games. There’s currently no permanent fix for this, but a workaround that gets the job done is to simply close and re-open Steam several times.
- Click this link (you may be required to click Allow) to download Steam for Windows and save the Steam Setup file in your downloads folder.
- Installing Steam in the Game Porting Toolkit
- command: gameportingtoolkit ~/my-game-prefix ~/Downloads/SteamSetup.exe
- The Windows version of the Steam installer should open next – follow the prompts to perform the installation. After the installation completes and Steam attempts to start, you are likely to get an empty gray window that doesn’t load into Steam. If you get this issue, the next command will help you start Steam normally.
- Running Steam
- command: gameportingtoolkit ~/my-game-prefix ‘C:\Program Files (x86)/Steam/steam.exe’
- If the empty window issue continues, use the next command.
- Logging in to Steam
- command: MTL_HUD_ENABLED=1 WINEESYNC=1 WINEPREFIX=~/my-game-prefix /usr/local/Cellar/game-porting-toolkit/1.0/bin/wine64 ‘C:\Program Files (x86)\Steam\steam.exe’
- If the annoying Game Porting Toolkit Steam problem with the blank client window persists, close and re-open the Terminal and try again. Keep doing this until the app finally loads properly (after a couple of attempts, Steam should load normally).
When Steam finally pops open, you can log in, navigate to your library, and get to downloading and installing your desired games. Bear in mind that not all games might run smoothly through the Game Porting Toolkit translation layer – performance issues may crop up, and some games might not even launch. It’s a bit of a testing ground, figuring out which games make the cut and which ones don’t.
Game Porting Toolkit 1.0 UPDATE
The Game Porting Toolkit version 1.0 was recently released and can now be downloaded from Apple Developer site. This is the first full version of the toolkit meaning that it’s no longer in it’s beta state. In practice, it is not yet fully clear what new improvements there are, as there’s no official change log. For the time being, it seems that the performance on some games, such as CS2, has been marginally improved, but there don’t seem to be any significant changes. If you want to try out the Game Porting Toolkit 1.0 update, it’s enough to search for it in the Apple Developer downloads webpage page and download it from there. After that, the rest of the process is identical – use the instructions and the Terminal commands provided on this page to set up the Toolkit and to install and run the games you want to play.
Game Porting Toolkit Battle.net installation
It’s also possible to install the Battle.net launcher in a Game Porting Toolkit Wine prefix and then download Blizzard games, including the newly-released and highly-popular Diablo 4. Here’s how to do this:
- Download the Windows version of the Battle.net launcher in your Downloads folder.
- If you want to play Diablo IV, you must run the following script in the Terminal:
- WINEPREFIX=~/my-game-prefix $(brew –prefix game-porting-toolkit)/bin/wineserver -k
- Installing and running Battle.net:
- command: gameportingtoolkit ~/my-game-prefix ~/Downloads/Battle.net-Setup.exe
- Follow the prompts of the installer to perform the installation of the Battle.net launcher in the Game Porting Toolkit.
- Note: there’s currently an issue that prevents you from re-opening and re-logging in the Battle.net launcher after having closed it once. Use the command in the next step to circumvent this annoying Game Porting Toolkit issue by directly launching each game individually, without needing the launcher.
- Starting each game individually:
- command: arch -x86_64 gameportingtoolkit-no-hud ~/my-game-prefix ‘C:\Program Files (x86)\Diablo IV\Diablo IV Launcher.exe’
- Note: this command is specific for Diablo IV. If you want to start another Battle.net game using the Game Porting Toolkit, you’ll need to type the path of its .exe file in the place of Diablo IV’s .exe path within the command.
Game Porting Toolkit Epic and GOG installation (through Heroic Games Launcher)
Currently, the normal version of the Epic Games Launcher doesn’t run through the Game Porting Toolkit, which is why the method used here is through the Heroic Games Launcher – an open source app that serves as a game launcher for Epic Games and GOG. Follow the instructions below to install and open the Heroic Games Launcher through the Game Porting Toolkit and then download and play the games in your Epic and GOG libraries.
- Go to this github page, log in to GitHub (or sign up now), and download a .dmg file for the Heroic Games Launcher.
- Double-click the .dmg file and install the launcher in your Mac’s Applications folder.
- Open the Heroic Games Launcher and log in to your Epic Games Store or GOG account.
- If the app won’t open for whatever reason, open a Terminal window, type xattr -cr, leave a space and then drag and drop the Heroic Games Launcher icon right next to the command in the Terminal window. This will copy-paste the launcher’s file path in the Terminal window. Then execute the full command, which should look something like xattr -cr /Applications/Heroic.app. Once the command is performed, try to open the launcher once again.
- When the launcher opens, and you log in to Epic or GOG, go to Library in the top-left, find the game you want to play, and select it.
- Next, select Install, confirm that the game will be installed in Heroic’s directory (should look like /Users/Admins/Games/Heroic), and click Install again.
- Once the game is installed, click on the Settings icon in the top-right (next to the three-dots button), and change the CrossOver/Wine Version to Gaming Toolkit Standalone – wine 7.7 Also make sure that the WinePrefix Folder path and name are correct so that the game will be launched through the Game Porting Toolkit. The default path for your Wine prefix should be /Users/Admins/*Wine Prefix Name*.
- Close the Settings window and click on the Play button. The game should now start without a problem using the Game Porting Toolkit translation layer.
Game Porting Toolkit: Troubleshooting and Fixes
Unsurprisingly, when attempting to run games using the Game Porting Toolkit, you are bound to come across different obstacles that may interfere with gaming performance or make certain games outright unplayable. In this section, we’ll cover known fixes to some frequently-encountered Game Porting Toolkit problems. However, know that not all hindrances you may encounter with this app can be resolved. For instance, most games with anti-cheat systems, such as Valorant or Overwatch 2, are still unplayable on Mac via emulation, which includes the Game Porting Toolkit. That said, there are some instances when something can be done to circumvent the obstruction. For instance, Elden Ring also has an anti-cheat system, but there’s a workaround that lets you play the game offline through the Game Porting Toolkit, which is one of the fixes that will be covered here.
Steam black screen at login
This is a potential alternative Game Porting Toolkit fix to the aforementioned Steam black screen issue that uses the macOS version of Steam:
- Download Steam for macOS and install it on your Mac.
- Access this folder /Users/$USER/Library/Application Support/Steam and copy from it the following items:
- config
- registry.vdf
- userdata
- Paste the copied items into the Steam folder in your Game Porting Toolkit Wine prefix. The default location of the folder should be ~/my-game-prefix/drive_c/Program Files (x86)/Steam/.
- You should now be able to normally open your Wine prefix Steam without the black screen bug.
Steam crashing
Apparently, having external monitors connected to your Mac can cause Steam to crash when you are using it through the Game Porting Toolkit, so if you encounter this problem and are using external screens, try disconnecting them and then restarting Steam.
Elden Ring Easy Anti-Cheat workaround
There’s currently no way to run games with anti-cheat systems through the Game Porting Toolkit, so the workaround for Elden Ring is to start the offline version of the game, which doesn’t require Easy Anti-Cheat to run. Of course, this will block your access to any multiplayer features, but will at least allow you to play the game in single-player. Here’s how to do this:
- Once you’ve set up everything else in the Game Porting Toolkit and have opened the Windows version of Steam in your Wine prefix, find Elden Ring in your Steam library and right-click it, select Manage > Browse local files.
- Open the game’s folder and rename the start_protected_game.exe file (should have the anti-cheat’s icon) to start_protected_game_original.exe.
- Next, rename the eldenring.exe file to start_protected_game.exe.
- Close the game files window and start Elden Ring normally – the Game Porting Toolkit should now launch the non-anti-cheat, offline version of the game, and you’ll be able to play it in this way.
Old Windows version error
To fix this Game Porting Toolkit error, try running the following script in the Terminal and then try to again launch the game that gave you the error:
WINEPREFIX=~/my-game-prefix brew –prefix game-porting-toolkit/bin/wine64 reg add ‘HKEY_LOCAL_MACHINE\Software\Microsoft\Windows NT\CurrentVersion’ /v CurrentBuild /t REG_SZ /d 19042 /f
WINEPREFIX=~/my-game-prefix brew –prefix game-porting-toolkit/bin/wine64 reg add ‘HKEY_LOCAL_MACHINE\Software\Microsoft\Windows NT\CurrentVersion’ /v CurrentBuildNumber /t REG_SZ /d 19042 /f
WINEPREFIX=~/my-game-prefix brew –prefix game-porting-toolkit/bin/wineserver -k
Nothing is loading after Wine crashes
This can happen from time to time when using the Game Porting Toolkit and the easiest way to fix it is to close all Wine threats with the following Terminal command:
- killall -9 wineserver && killall -9 wine64-preloader
Controller problems
If you are experiencing any problems with your controller when trying to play games through the Game Porting Toolkit, it’s possible that enrolling to the Steam beta can help resolve those issues.
Pixelated game/limited display resolution
The fix for this Game Porting Toolkit problem is to Retina Mode (high resolution mode) using the following command:
- WINEPREFIX=~/my-game-prefix brew –prefix game-porting-toolkit/bin/wine64 reg add ‘HKEY_CURRENT_USER\Software\Wine\Mac Driver’ /v RetinaMode /t REG_SZ /d ‘Y’ /f
Note that some games won’t run while this mode is turned on, so to disable it, use this command:
- WINEPREFIX=~/my-game-prefix brew –prefix game-porting-toolkit/bin/wine64 reg add ‘HKEY_CURRENT_USER\Software\Wine\Mac Driver’ /v RetinaMode /t REG_SZ /d ‘N’ /f
AVX and AVX 2 games like Red Dead Redemption 2 won’t run
Games that use Advanced Vector Extensions (AVX and AVX 2) aren’t supported for ARM 64 chips, so they normally cannot run on M1 and M2 Macs, even when you try to launch them with the help of the Game Porting Toolkit compatibility layer. There is a possible workaround that can provide a solution for certain titles, like Dying Light 2:
- Find the game in your Steam library, right-click it, and go to Manage >Browse local files.
- Navigate to this location ph\work\bin\x64 and rename the runtime_dx11.dll file to runtime_dx11.dll.bak.
- Try to start the game again.
- If you need to go back to the regular runtime_dx11.dll file, simply delete the .bak extension.
Final Notes
So this is our article on how to set up and use the Game Porting Toolkit to game on your Mac. We’ll make sure to update this post with any new fixes and details about this app, that you may find useful and helpful, so be sure to keep tabs on this page to learn the latest information!
Sources used for the making of this Game Porting Toolkit article:
The Apple Gaming Toolkit, also known as the Game Porting Toolkit, is a powerful app that uses Apple’s D3D translation layer to allow for Windows games to be run on Mac computers, including titles that require DirectX 12. Its downside is the lack of a user-friendly interface and the need to use Terminal commands to operate the app. Two good ways to make using the toolkit a lot easier is to combine it with Whisky, a graphical interface app for GPTK, or with CrossOver, another translation layer app that has a user-friendly interface and tends to be more stable than vanilla GPTK.
To use the vanilla Game Porting Toolkit, you’ll need to use a number of Terminal commands in order to set up the app. The exact commands and the sequence in which they must be used, as well as instructions for troubleshooting some common GPTK issues, are available in our guide on this page. An alternative way to use the Game Porting Toolkit is to integrate it into the CrossOver app or the Whisky GUI wrapper, which makes the entire process a lot easier and quicker.
Yes, the Game Porting Toolkit works well with Steam and allows you to launch the majority of games available in this game store. One possible drawback is an annoying issue where the Steam client appears as a blank window, but closing and re-opening the client app usually solves the problem.
If you encounter the “zsh: command not found: gameportingtoolkit” error, it’s because the terminal isn’t recognizing the ‘gpt’ file globally. To address this, either move all three files to /usr/local/bin and then call it with ‘gameportingtoolkit’ (you might need to restart the terminal), or place it in a specific directory and use its full path, such as ‘~/gameportingtoolkit’ for the home directory.
The error “ditto: cannot get the real path for source ‘/volumes/game porting toolkit-1.0/lib/’” arises when the Game Porting Toolkit DMG file isn’t mounted. To resolve this, simply open the DMG file and ensure it remains open throughout the entire installation process.
Leave a Reply