About Boot Camp Assistant
Boot Camp Assistant is a built-in Mac that has a variety of uses, but for the purposes of this guide, it will be used to install Windows 10 on an Intel-based Mac. M1 Macs don’t have this app, so, if you want to install Windows on an M1 Mac, you will need to use a virtualization program, such as Parallels.
Before we show you how to install Windows 10 on your Intel-based Mac using Boot Camp Assistant, there are several important notes that we must make.
- First and foremost, note that the Boot Camp Assistant would install Windows in a separate partition, so your macOS will not be deleted.
- Next, even though your macOS partition and the data in it won’t be touched, it’s still highly advisable to not take any chances and first back up your data before proceeding if there are any important files stored on your Mac that haven’t been backed up yet.
- Thirdly, before starting the installation, make sure that there’s enough free space on your Mac so that the machine’s drive would be able to accommodate the new operating system. As already noted, once the installation finishes, both macOS and Windows would be installed on your Mac in separate partitions. The Windows 10 installation takes up 64 GB of space, but it’s strongly recommended having at least 200 GB of free space before you begin the installation process, as some space empty buffer space would need to be left for both your macOS partition and your Windows partition. Also, if you are installing Windows on your Mac for the purposes of installing and playing Windows games, you will also need to account for the space that the game you want would take on your Mac.
Now, without further ado, let us show you the process of installing Windows 10 on Mac through the use of the Boot Camp Assistant app.
Windows 10 with Boot Camp Tutorial
Tutorial Overview
- Downloading the Windows 10 ISO file
- Preparing for the Installation
- Starting the installation of Windows 10
- Customizing Windows 10 and installing necessary updates
Downloading the Windows 10 ISO file
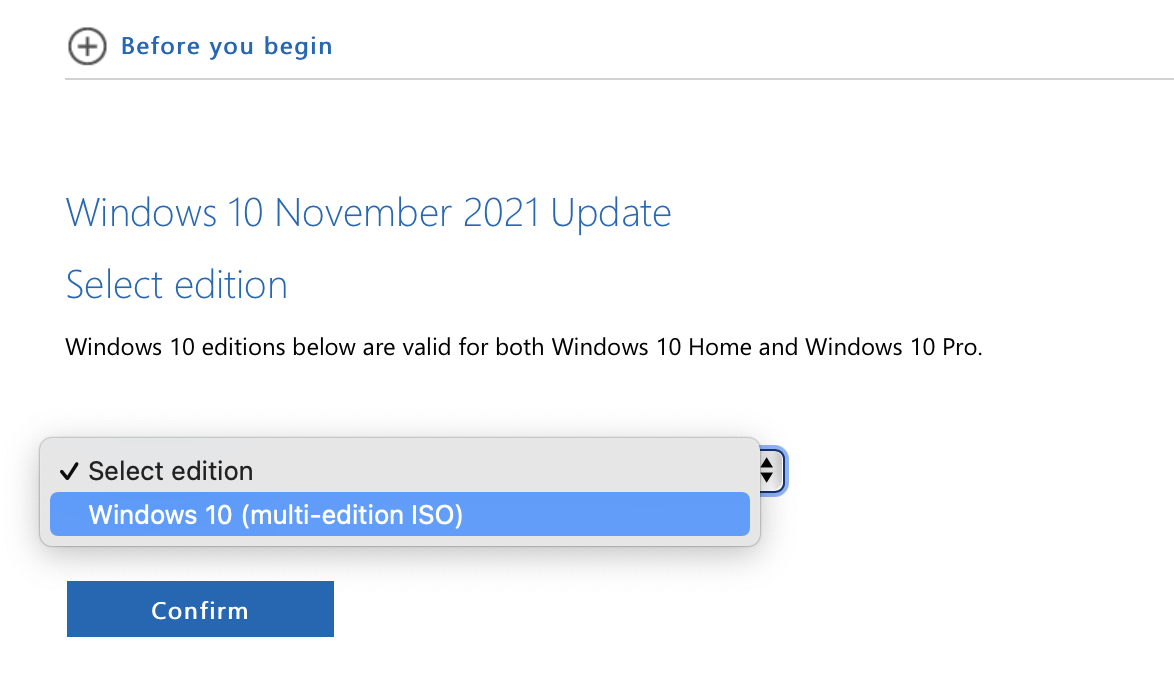
- First, you will need to acquire the Windows 10 ISO file – you can download it from this Microsoft page. Once you go to it, choose a Windows edition (there’s usually only one option, if there are more than one options, choose the Home edition) and confirm your selection.
- Next, select a language, Confirm, then click on the 64-bit Download and begin downloading the file. Since this is a big file, depending on how good your Internet is, you may need to wait for a while before the download completes.

Preparing for the Installation
- After the ISO file is downloaded on your Mac, go to your Application folder, open Utilities, and start the Boot Camp Assistant app.
- Click Continue in Boot Camp Assistant, and then click the Choose button (you may need to click Choose twice).
- Next, in the newly-opened window, navigate to the directory where the downloaded ISO file is stored, select the file, and click Open.
- Next, you must change the storage space distribution between the two partitions – to do that, drag the dot between them to the left or right. Be sure to leave at least 50 GB of free space to the macOS partition, and give no less than 100-120 GB to the Windows 10 one. Again, as we said earlier, if you intend to install any games in the Windows partition, allocate more space to it based on how big the game is.
- Once all preparations have been made, click Install, wait for the initial loading process to complete, then type in your password to restart your Mac and begin the installation.
Starting the installation of Windows 10
- Once the Mac restarts, and you get to a Windows logo screen, specify your location and the language you prefer, and click Next.
- After that, you should be asked to enter a Windows product key – if you don’t have one, you can still continue by selecting the I don’t have a product key/Skip button. If you do have a key, enter it and click Next.
- If you clicked I don’t have a product key/Skip, you will next be asked to pick between Windows 10 Home and Windows 10 Pro. Your choice here should be inconsequential for the most part, and should only come into relevance if you later decide to purchase a Windows 10 product key. Still, we recommend picking the Home version unless you have an actual reason to prefer the Pro version, in which case you should, of course, go for it.
- After that, all that’s left to do is to Agree to the Terms and Conditions of installing and using Windows 10 and then click Next/Install to launch the installation. While Windows 10 is being installed on your Mac, be sure that if you are using a MacBook, the machine stays plugged in the entire time so as to prevent its battery from running dry. It is very important to not shut down your Mac and to not allow it to shut down during the installation (which could take a while to complete).
Customizing Windows 10 and installing necessary updates
- Once Windows 10 installs on your Mac, the machine will restart once more and will this time boot into the Windows 10 setup screen. There, you can choose to personally customize the settings of the new OS – something we strongly recommend. There’s also the option to use the default settings, but it’s best to refrain from that if you have a couple of minutes to spare to customize everything yourself.
- After the customization, you must create a Windows account – simply type a username and a password and continue.
- Next, you will be asked to set up Cortana – the Windows virtual assistant. This step can be skipped entirely, so feel free to move on.
- Now your Mac should finally load into Windows 10, but there are a few remaining things to take care of. First, there should be a Boot Camp Assistant on your screen – click Next in it and follow the prompts to let it install drivers that your Mac needs to function properly with Windows 10. After completing the installation, agree to restart your Mac.
- This final step is optional, yet we strongly recommend performing it if you want to get the best possible Windows 10 experience on your Mac – there are two things that need to be done here:
- Search in the Start Menu (bottom-left) for Apple Update, open the item that gets found, see if there are any pending updates, install them, and restart your Mac.
- Again, from the Start Menu, go to Settings > Update & Security, select Windows Update, and install any updates that may be available there. After that, perform one final restart of your Mac.
After completing all of those steps, your Mac should be ready for use with Windows 10 and you can use its Windows partition to play games as if you were using a Windows PC.
Ways to switch between macOS and Windows 10
The simplest way to switch between partitions is to restart your Mac – when it starts booting back up, you should be asked to choose which partition to boot into (macOS or Windows).
Another way to restart your Mac into Windows while you are in macOS is to go to Apple Menu > System Preferences > Startup Disk, unlock the options in that window by pressing the padlock and entering your password, then click the Windows BootCamp option, and confirm the action.
If you want to go from Windows to macOS, click the tilted/slanted square in the bottom-right, and select Restart in macOS. If you don’t see the square icon, click the small upward arrow, and it should be revealed in the box with other icons that show up.
Leave a Reply