Working remotely has dramatically changed the way we keep in touch and share information. Now, more than ever, we rely on technology to get the work done. There are a number of useful functions that help us with that but staying in control of our data is probably the most important one. For instance, who can access and change files and folders on a computer depends on the permission settings.
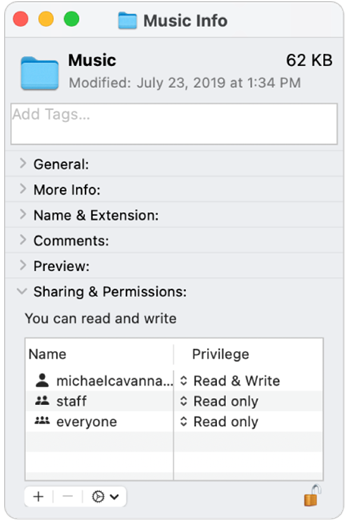
Mac users can change these permission settings in the Finder, when they go to the bottom of the Information window of a given file, folder, or disk. This functionality is especially useful when you want to allow other users who log in to your Mac computer, or connect for file sharing, to view specific files and folders but, at the same time, want to restrict them from making changes or viewing other files and folders that you don’t want to share with them.
If you want to learn more about these settings and how to use them, on this page, we have prepared quick instructions that will help you.
Enable users and groups permissions
- Firstly, choose a drive, folder, or file on your Mac.
- To change its permissions, select File > Get Info.
- If you do not see the details in Sharing & Permissions, press the arrow
- Look at the bottom right and if you see a padlock icon there, click it to unlock the Get Info options. You may need to enter your administrator password and username for that.
- In the Name column, select a user or group. After that, from the pop-up menu that appears, you have to choose a privilege setting from one of the following:
- Read & Write – this setting gives permission to the selected user/group to open a file/folder and make changes to it.
- Read-only – this setting allows the selected user/group to only open a file/folder but not to make any changes to its content.
- Write only (Drop Box) – this setting makes a folder into a drop box where the selected user/group can copy items to the drop box but are not allowed to open it. The owner of the drop box is the only one who has permission to open it.
- No access – this setting restricts all access to the selected file/folder or disk.
Mac users can undo the changes made to the privilege settings for a specific user or a group when they navigate to the Get Info window and select the Sharing & Permissions section. Select the Action menu (a three dots icon), and click on “Revert changes” before closing the Info window.
How to set permissions to all files in a given folder or the entire disk?
- Similar to what you did above, start with choosing a folder or disk on your Mac, then select File > Get Info.
- Take a look at the padlock icon at the bottom and if it is locked, click on it to unlock the Get Info option. You will be asked to type in your administrator’s password and name.
- Next, select the Action pop-up menu (the three dots icon) and click on the option that says “Apply to enclosed items”.
How to change the owner of a given file, folder or disk?
- You need to highlight the file, folder, or disk that you want on your Mac and then select File > Get Info. In case the padlock icon at the bottom right is locked, click it to activate the Get Info options, then type your admin name and password.
- If the name of the new owner is not specified in the Name column found in Sharing and Permissions, please press Add icon and add the new owner’s name.
- Then, select the name of the new owner that you’ve just added from the Name column, click on the Action pop-up menu and then choose the option that says “Make __ the owner”.
You can revert any modifications made to an item’s owner in the Sharing & Permissions section found in the Get Info window. Click the Action pop-up menu, and pick “Revert changes” before shutting the Info window.
How to remove or add a user or group in the Name column?
- Again, choose a file, folder, or disk on your Mac, and then select File > Get Info. (Pay attention to the padlock icon at the bottom right and if it is locked, click it to activate the Get Info options on your Mac computer. Enter admin name and password if required.
- Navigate to Sharing & Permissions section and then do this:
- For adding a user or group: Click the Add icon below the Name list, highlight a user or group that you want to add, and then click on the Select button.
- For removing a user or group: Highlight the user or group that you want to remove, and then click on the “Remove” button that is found below the Name list.
Undoing the changes is easy from the Sharing & Permissions section of the Get Info window. Simply select the Action pop-up menu and tap on “Revert changes” before you close the Info window.
Generally, with the help of these instructions, you can fully control who accesses and modifies the items that you keep in your Mac computer. They come in handy when you share access to different files, folders, or disks, or let other people log in to your device.
Leave a Reply