Hey there, Mac aficionado! Struggling with limited storage space on your beloved Mac? Don’t worry, you’re not alone – about 80% of Mac users face this issue. But don’t reach for your wallet just yet! There’s no need to sprint to the store for a new Mac. We’ve put together an in-depth guide to help you tidy up your current device by getting rid of unnecessary files, app settings, temporary files, and other digital clutter. Stick around, and you’ll soon be rewarded with a ton of extra storage space and a significant boost in performance!
First things first, let’s figure out how much storage you have left and pinpoint the space hogs. Here’s a quick method to check your Mac’s storage situation:
- Click the Apple menu and select About This Mac.
- Choose the Storage tab.
- Wait for the different storage sections to be calculated to see how much space is taken by a particular type of files.
Examine the bar to see how space is allocated to Music, Photos, System, Apps, and other large files.
Now that you know what’s taking up space, let’s explore how to free up some of that precious storage!
Why you need to free up space on Mac
First and foremost, if you free up space on your Mac, this can significantly boost its speed. When your hard drive is jam-packed, your Mac has a harder time finding the files and data it needs, causing it to slow down. By freeing up space, you’re giving your Mac room to breathe, allowing it to run more efficiently.
Secondly, a clutter-free Mac is a happy Mac! When you keep your files and folders organized, it’s much easier to find what you’re looking for, and that saves you time and frustration. Plus, let’s be honest, a tidy desktop is just so much more visually pleasing!
Another reason to free up space on your Mac is to ensure you have enough room for essential updates and new software. Operating system updates and new apps often require a certain amount of free space to be installed. If you’re running low on storage, you might miss out on these crucial updates, leaving your Mac vulnerable to security threats or outdated software.
Don’t forget that freeing up space also means you’ll have more room for new files, photos, and projects! There’s nothing worse than being in the middle of an important task and realizing you don’t have enough space to save your work. By keeping your Mac’s storage in check, you’ll always be ready to take on new challenges and adventures.
Lastly, regularly decluttering your Mac is simply good digital hygiene. Just like spring-cleaning your home, taking the time to organize your digital life can bring a sense of accomplishment and peace of mind. So, go ahead and show your Mac some love by freeing up space—you’ll both be better off for it!
How to free up space on Mac
There are many different ways to free up space on a Mac, and we’ll show you the best of them in the next lines. From migrating your less essential data to a cloud storage and fully deleting unneeded apps to clearing browser cache and unused media files, there’s a lot that can be done to help you reclaim a lot of your Mac’s storage.
Utilize built-in storage optimization tools
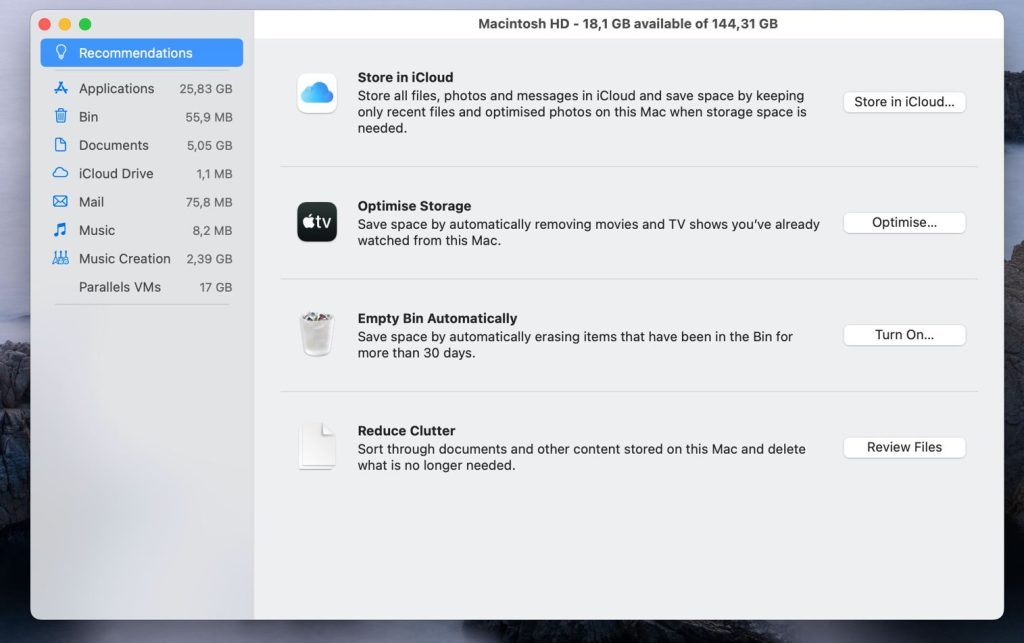
Apple kindly offers some handy storage management tools to help you optimize your space. Access them by clicking Apple menu > About this Mac > Storage > Manage. You’ll see various categories displaying what’s eating up your storage, and you perform the recommended actions to help you free up space on your Mac.
Make friends with cloud storage
Cloud storage is a brilliant solution to save space on your Mac. Apple’s iCloud is an excellent choice since it integrates seamlessly with macOS and provides 5GB of free storage. With a subscription, you can expand this storage even more. To use iCloud to free up space on your Mac’s hard drive:
- Click the Apple icon in your menu bar and select System Preferences.
- Opt for General, and click Storage.
- Click Store in iCloud.
- Ensure Desktop and Documents, as well as Photos, are selected, and click Store in iCloud.
Ditch unused apps and their leftovers
Unused apps can be real space-hogs on your Mac. Thankfully, macOS offers several ways to delete them. Here’s the most direct method:
- Go to Finder and select Applications.
- Drag an unneeded app to the Trash.
- Empty the Trash.
You can also remove unused apps via Launchpad (this works only for apps downloaded from the App Store):
- Open your Mac’s Launchpad.
- Long-click an app icon until it begins to shake.
- Click the X symbol that appears next to the app you want to delete.
Deleting duplicate file
It’s a well-known fact that duplicate files are an unavoidable part of our digital existence. We often inadvertently download app installers or email attachments multiple times, create various document copies, and edit a plethora of photos. As a result, duplicates accumulate and can gobble up a whopping 30% of your storage space! It’s high time we put an end to these sneaky space snatchers.
Automatically cleaning the Trash/Bin
Now, what about the Trash? Normally, you have to empty it manually, but there’s a nifty trick to automate this mundane chore. By enabling the “Remove items from the Trash after 30 days” setting, you can salvage up to 30% of your hard drive space each month.
- To activate this feature, open any Finder window, go to the Finder menu and open Settings
- Ensure the “Remove items from the Trash after 30 days” checkbox is ticked.

Deleting browser cache
As a hardcore internet user, your Mac’s drive is probably chock-full of temporary files called browser cache. While they do help speed up loading times for previously visited pages, an excessive cache can put the brakes on your Mac and eat into your storage space. By clearing the cache and cookies from all your browsers, you can liberate several hundred megabytes of precious space.
Deleting Chrome cache
- Click the three-dot icon in the top-right corner and click More Tools.
- Select Clear Browsing Data, choose a time range to erase the browsing data, tick the boxes next to Browsing history, Cookies and other site data, and Cached images and files.
- Finally, click Clear data to complete the process.
Deleting Safari cache
- Safari users should open the browser and then go to Safari > Preferences > Advanced.
- Next, enable the Show Developer menu in the menu bar option and click Develop in the top menu.
- Select Empty caches, and then choose History > Clear History to annihilate Safari’s cookies.
Deleting Firefox cache
- Firefox users should access the browser’s menu and select Settings.
- Then they must proceed to the Privacy & Security panel and locate the Cookies and Site Data section.
- There, click on Clear Data, tick all available boxes, and confirm the action.
Deleting unused languages
Next, let’s discuss unused language files. Your Mac comes preloaded with over 180 languages nestled in localization files, occupying around 1.5 GB of your hard drive space. The chances are that you only use a few of them, so why not free up some space by getting rid of the rest? Keep in mind that removing unused language files can impact your user experience, as your applications will reflect your macOS language. To change an app’s language, you’ll have to reinstall it, and for Apple’s pre-installed apps, a macOS reinstall is required.
- To purge unnecessary language files, venture into the Applications folder and right-click an app.
- Choose Show Package Contents from the contextual menu, access the Contents folder and proceed to the Resources folder.
- There, sift through the folder and delete all subfolders ending with .lproj, except for the ones you need (e.g., en.lproj for English, es.lproj for Spanish).
- Finally, empty the Trash to wrap up the process.
Clearing your Desktop
As you scan through the files on your desktop, you’ll find that some can be safely tucked away in other folders, while others can be tossed out to free up precious space on your hard drive.
- To manually spruce up your desktop, start by opening Finder and clicking on Desktop.
- Then, under the View menu, select the ‘as List’ option. This will allow you to sort items by size so you can easily identify and delete the largest culprits.
- If your Mac is running Mojave or a later macOS version, there’s a neat feature called ‘Stacks’ that you can take advantage of. Just click anywhere on your desktop and select ‘Use Stacks’ in the window that appears. With a mere two clicks, you’ll witness a miraculous transformation as your files become neatly stacked and sorted by categories. If needed, you can even delete them all in one fell swoop, potentially liberating hundreds of megabytes of storage space.
Deleting unused media data
Finally, if your Mac is cluttered with music, movies, or podcasts you no longer need, it’s time to bid them farewell.
Deleting music from your Mac is a breeze. Just follow these steps:
- Start by opening Apple Music and choosing either the Songs or Albums section from the sidebar.
- Next, select View from the menu bar at the top and click the Only Downloaded Music option.
- Now you’ll see a list of downloaded items. To remove a particular album or song, simply click the three dots next to it and select Remove Download.
Next, let’s tackle those movies.
- Open Apple TV and click on Library.
- Now, look for and select the Downloaded section in the sidebar.
- As you browse through your downloaded content, you’ll notice three dots next to each movie or show. Click on those dots and select Remove Download. Voilà, space reclaimed!
Finally, let’s clear up your podcasts.
- Launch the Podcasts app and select Downloaded from the left.
- Pick the podcast you want to delete downloads from.
- To remove a single episode, simply click the download icon (the small downward arrow) on the right-hand side.
- If you’d rather delete all downloaded episodes for that podcast, go to View, choose Remove Downloads, and confirm by clicking Remove Downloads again.
There you have it! Now your Mac is breathing a little easier, and you can enjoy the newfound space.
Leave a Reply