About Maven on Mac
Maven can be installed on Mac and be used for the automation of Java projects as well as projects written in Scala, Ruby, and other languages. To get Maven on your Mac, download the binary tar.gz file from its official site and extract it.
Maven is an open-source project written in Java and hosted by Apache Software Foundation. Maven started out as a part of the Jakarta Project but continued to exist on its own after the Jakarta Project was retired in 2011. The purpose of Maven is to ease the process of building software by simplifying and standardizing some time-consuming tasks and aspects, namely:
- Dependencies
- Reports
- Distribution
- Documentation
- SCMs
- Builds
- Mailing list
- Releases
The end result of employing Maven during software development is that the developer would not need to spend any time manually configuring all of those aspects, and could instead rely on Maven to perform those tasks.
Maven helps developers by providing them with reusable and comprehensive project models, as well as a set of helpful tools that enables them to easily interact and modify the project they are working on.
What is Maven on Mac?
Maven on Mac is a type of command-line tool used that lets the user build and manage projects written in Java (and other languages). To install Maven on your Mac, you will need to download its file, extract it, and then configure Maven.
Maven can be used on Windows, Linux, and, yes, it can also be used on Mac. The process of setting up Maven slightly varies depending on the OS you are using, but once the tool is ready for use, its features are the same across the different operating systems.
Here are some of the more important software-building features you’d get with Maven on your Mac:
- Integrity and error reports
- Dependencies management that includes automatic version updates
- Makes the process of setting up new projects considerably easier thanks to the use of best practices
- The tool is extensible and allows you to write new plug-ins using Java or scripting languages
- A huge and constantly-growing user library at your disposal
- Backward compatibility with earlier versions
- Usable across different projects
- Parent versioning is automated
Does Maven work on Mac?
Maven works on Mac, Windows, and Linux, and it can be downloaded for free from its official site. The installation of Maven on Mac is simple – just download the binary tar.gz file, extract it, and then configure Maven according to your macOS version.
There aren’t any specific requirements for using Maven on Mac, other than making sure to configure it for the specific macOS release that you have at the moment. To be more specific, there are slight differences between the commands used to configure Maven for Macs running on macOS Catalina or higher, on the one hand, and Macs running on older macOS versions, on the other. Also, for Mac users with macOS Sierra, there’s one additional command that must be used to set up Maven. Down below, we will show you what you need to do to download, install, and set up Maven on your Mac.
How to install Maven on Mac
To install Maven on Mac, first, visit the project’s official site and from there download the binary tar.gz file. Next, extract the file to install Maven on your Mac and then configure the tool for your macOS version using the necessary terminal commands.
Below, you will find instructions that show the process of setting up Maven on your Mac. Note that you must make sure to use the instructions for the specific macOS version that your Mac has at the moment. You can see what the macOS version is by going to Apple Menu > About This Mac.
- First, you must visit this page and click the download link for the binary tar.gz file.|
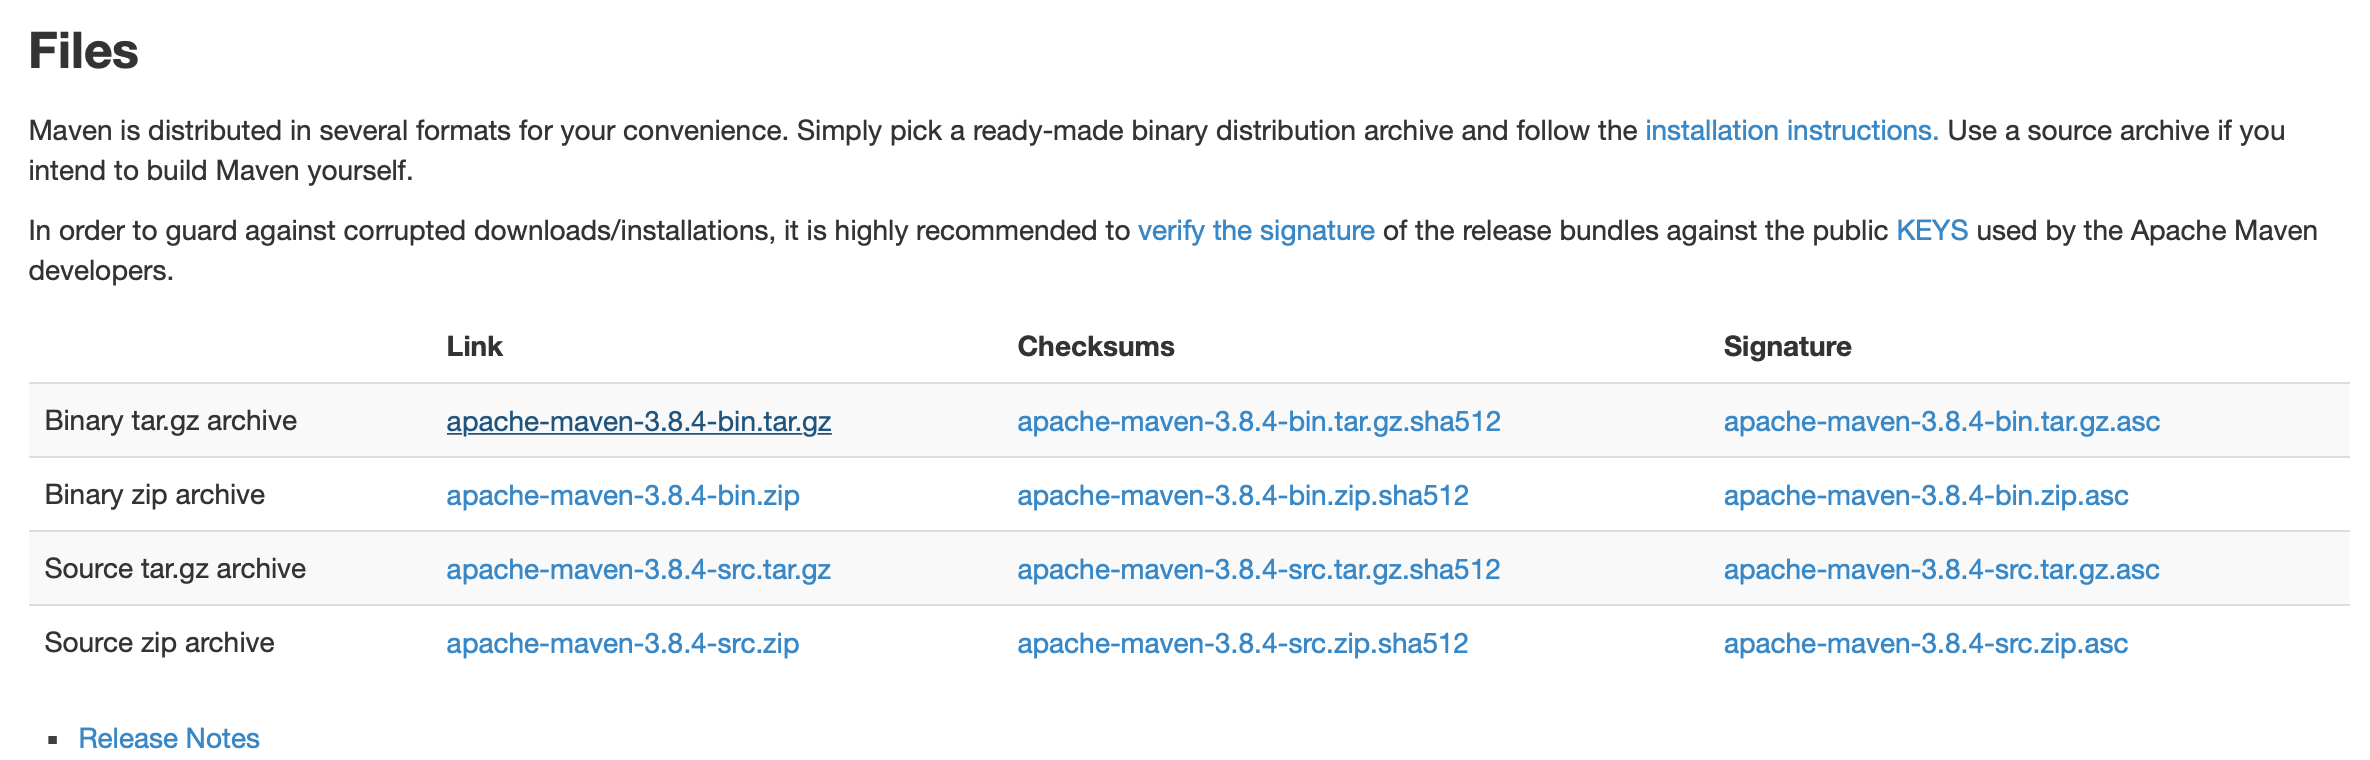
- Download that file on your Mac and then double-click it when it downloads to extract its contents.

- Next, if you want, change the location of the extracted folder, and then open Terminal
- In Terminal, navigate to the location of the extracted files and then as Super User.
The following instructions explain what commands you need to use to configure Maven in macOS. Note that the instructions for the different macOS releases are mostly the same, but there are a few exceptions that will be explained, so it’s important to use the commands for your specific version of macOS.
Instructions for macOS 10.14 Mojave or earlier
- First, remove the tar.gz archive with the following command: rm Downloads/apache-maven*bin.tar.gz
- Now use this command chown -R root:wheel Downloads/apache-maven* to fix the permissions settings.
- You must now switch the Maven contents with the help of the mv Downloads/apache-maven* /opt/apache-maven command.
- Use the exit command to archive the Admin session.
- Next, you’ll need to add Maven binaries to the path and append them:
- nano $HOME/.profile
- export PATH=$PATH:/opt/apache-maven/bin
- Now, to Save and Exit from nano, use the Control + X combination.
- If you want to load a new setup, use the bash command.
- Finally, the mvn -version command will let you test your new installation.
Instructions for macOS Catalina or later
For the most part, configuring Maven on macOS Catalina or later is done in the same way as we’ve shown above – there are only a couple of differences in the commands used:
- When adding Maven binaries and appending them, use this next command instead of the one shown above:
- nano ~/.zshenv
export PATH=$PATH:/opt/apache-maven/bin
- nano ~/.zshenv
- When reloading an environment, the command you need to use is: source ~/.zshenv
The other commands stay the same, so perform them as they are shown above.
Instructions for macOS High Sierra
If your Mac is running on High Sierra, follow the steps shown under Instructions for macOS 10.14 Mojave or earlier, but when you need to add Maven binaries and append, use the following command and not the one shown there:
nano $HOME/.bashrc
export PATH=$PATH:/opt/apache-maven/bin
Leave a Reply