Imagine this scenario: you’re at your desk with a sprawling Mac computer, and you’re looking at the stack of tasks ahead. But the real estate on your screen isn’t quite enough to juggle all your windows and applications. In that case, hooking up an external monitor to your Mac can give you the extra space you crave.
Every Mac model has a varying number of external display support. But don’t worry, the steps to connect an external monitor are straightforward.
How to connect a Mac to a monitor
Let’s start with the fundamentals on how to connect your Mac to a monitor. Your external display needs two essential connections: power and data. First off, locate the power cord that came with your monitor and plug it into a power source. Easy enough, right?
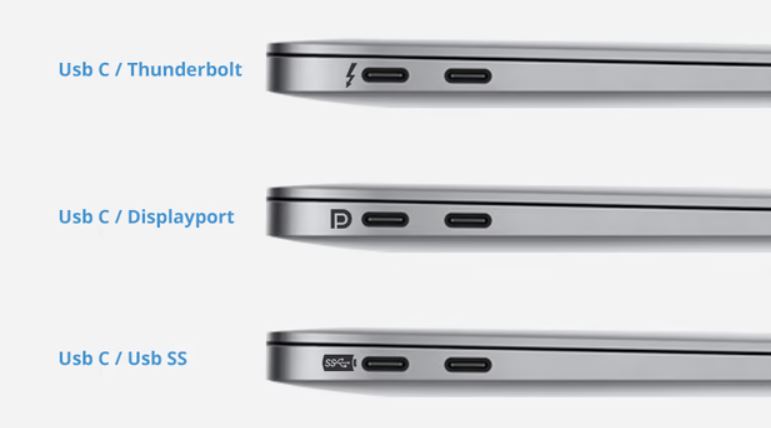
Next, let’s tackle the data connection between your Mac and the monitor. You will need to find the video cable that comes with your monitor. Depending on your Mac model, this cable may connect directly to a Thunderbolt or HDMI port on your Mac. It’s crucial to note that while some ports may resemble each other, identifying the correct port ensures a smooth setup.
Do you find that the video cable doesn’t match any of your Mac’s ports? No problem – you can either use an adapter to bridge the gap or swap out the original video cable with one that fits your Mac’s ports.
Once your monitor is receiving power and has a solid data connection with your Mac, the Mac should automatically detect it. Your Mac desktop should now extend onto the external monitor. However, if your display is showing a dark screen or not using its highest resolution, you may need to troubleshoot.
How to connect MacBook to monitor
Here’s what you should know about connecting your MacBook to an external monitor (or monitors!): different MacBook models come with varied monitor-support capabilities. For instance, the 16” MacBook M1 Pro, with its Thunderbolt 4 (USB-C) and HDMI ports, can easily cater to two external monitors. However, if you’re a MacBook Air 13” user, the native hardware supports just one additional screen. But fear not! There’s a way to link up an extra monitor (more on that later).
So, how does one hook up an extra screen to a MacBook Pro? It’s a walk in the park. Begin by connecting the monitor to its power source. Then, using a Thunderbolt/USB-C or HDMI cable, plug the monitor into your MacBook. With the MacBook M1 Pro’s dual monitor support, you can achieve up to 6K resolution at 60Hz, perfect for tasks like video editing or CAD tasks. Don’t forget to fiddle with the display settings for optimal visuals.
- A quick tech comparison here: Thunderbolt 4 versus USB-C. Thunderbolt 4, often lauded as the king of ports, supports data transfer speeds up to 40 GB/s and can power two 4K displays simultaneously. On the other hand, a standard USB-C port might seem less impressive, managing only half of Thunderbolt 4’s capacity. However, remember that a Thunderbolt port is friendly with a standard USB-C cable, so no worries if that’s what your monitor uses.
To connect effectively, take a minute to examine the ports on your MacBook. The 16” MacBook M1 Pro comes with a built-in Thunderbolt 4 (USB-C) port, whereas the MacBook Air 13” features a Thunderbolt 3 port. If your external monitor supports only a USB-A cable, you’ll need an adapter, like the ThinkPad Universal Thunderbolt 4 Dock. Pass the monitor connection through the adapter, and voilà, you’re set.
MacBook Air users longing for a second monitor have a workaround: a dual HDMI adapter. This device can run a 4K display at 60 Hz and a second 4K display at 30 Hz, thanks to Silicon Motion’s InstantView technology. Ensure this technology is granted privacy settings access, connect your monitors, and immerse yourself in a triple screen setup!
How to connect Mac mini to a monitor

Fancy getting a Mac Mini up and running? It’s not quite the plug-and-play experience since it lacks an included monitor. However, this tiny powerhouse offers versatility via its rear ports, welcoming various monitors into the fold. All you need is the right adapter, and it can mate with any VGA-enabled screen. While it comes packed with an HDMI-to-DVI adapter, that’s geared more towards Apple displays. If your monitor is of the more regular kind, you’d need an HDMI-to-VGA or a mini display port-to-VGA connector.
How to configure the display settings of your Mac’s monitor
So how about setting up the display preferences? From your screen’s Apple menu, you can navigate to System Settings or System Preferences and click on Displays. From here, you’re free to tinker with the display resolution, refresh rate, arrangement, and more, according to your liking.
Remember, not all displays are created by Apple, and some might have unique settings only accessible via the monitor’s own menu system. So, don’t forget to check your display’s manual for those details. Enjoy your new workspace!
How to connect a second monitor to a Mac
If you require even more screen real estate, on some Macs, you can get not one but two external monitors connected to the machine. You can rely on cables to forge these connections, but did you know your Mac can also go wireless? Absolutely! Not just another Mac, but also specific smart TVs can join your Mac’s wireless display network. Nifty, right? Here’s how you do it: head over to the Apple menu, find System Settings, and Displays will be right there in the sidebar. From there, under the Add Display pop-up menu, pick your display. Voilà, you’re connected!
If wires are more your thing, that works too! All you need to do is pair each display with a secure video cable and adapter, from your Mac’s video output port to the display’s video input port. Depending on your Mac’s model, you could connect multiple external displays.
For the M1 Chip Macs, you can tether a single external display. Interestingly, even docks can’t increase this number. But for the M1 Mac Mini, there’s room for one more display via the HDMI port.
What about Macs with Thunderbolt 3 (USB-C)? Good news! Each port can handle a single display. If you have multiple Thunderbolt devices in a chain, the Thunderbolt 3 display must be at the end of the line. It’s also cool that the USB ports on your Thunderbolt 3 display can be used for data and power.
Moving on to Macs with Mini DisplayPort, Thunderbolt, or Thunderbolt 2, you can hook up to two displays. And with Thunderbolt 4 (USB-C) and HDMI ports, depending on the model, your Mac could support up to four external displays!
Keep in mind, only the device directly connected to your Mac gets power from the computer’s Thunderbolt port. The others in the chain need their own power sources. Now go ahead, orchestrate your display symphony!
Use iPad as Second Monitor
In the sea of Apple’s innovative features, Sidecar is an oar that navigates the waters of multitasking efficiency by letting you transform your iPad into a second monitor for your Mac. Picture this – your iPad, propped up in landscape mode, echoing the dance of applications on your Mac or maybe flaunting a whole different set of windows. What a sight!
This feature, Sidecar, is part of the Continuity suite. What does it mean? Well, in essence, to harness this powerful tool, Wi-Fi and Bluetooth need to be active on both devices, and both should fulfill certain system requirements. Don’t fret! Apple has a detailed support article that outlines these ‘System requirements for Continuity on Mac, iPhone, iPad, and Apple Watch’.
Getting Sidecar up and running is a walk in the park. One crucial detail – ensure that both your Mac and iPad are connected to the same Apple ID. And then, let’s get the ball rolling. Navigate to your Mac’s Apple menu, delve into System Settings, and then click on Displays (you might have to scroll a tad bit).
See the ‘Add Display’ menu? It’s waiting on the right side, right below your Mac’s name. Your iPad will be listed there. Choose it, and your iPad is now a second screen. But wait, there’s another path leading to the same destination. You can tap into the Control Center, select Screen Mirroring, and then pick your iPad. And that’s it, you’ve set sail!
The cherry on top? The Screen Mirroring menu takes residence in the menu bar once Sidecar is active. This newfound resident empowers you to switch gears between mirroring and using the iPad as a separate display. Plus, you can choose to showcase or hide the sidebar or Touch Bar on your iPad. Adaptability at its finest, wouldn’t you agree?
Leave a Reply