Hey there! If you’re a budding front-end developer or working on debugging web applications, you’ve probably been using Safari as one of your go-to browsers. And for a good reason, too! Safari comes with a fantastic tool called Inspect Element that allows you to dig deep into the nitty-gritty of a webpage. Let us walk you through how to use this fantastic tool on your Mac.
How to enable Inspect Element on Mac
Before diving in, you’ll need to enable Inspect Element on your Mac’s Safari. Just follow these simple steps:
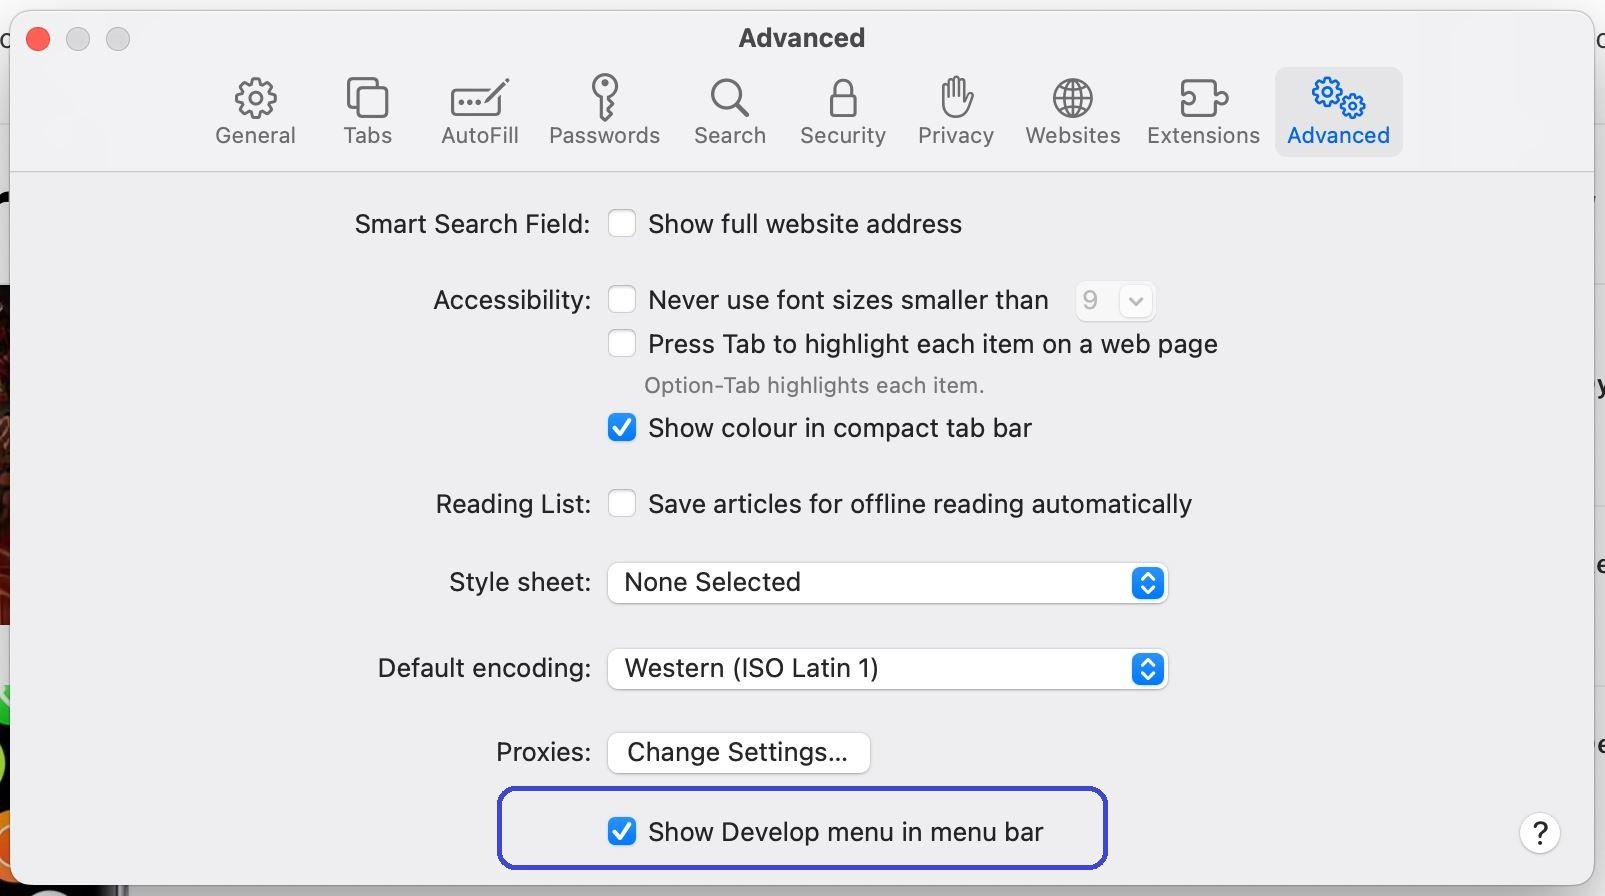
- Fire up Safari, click the browser’s menu from the menu bar on the top, and go to Preferences.
- Jump over to the Advanced tab in the Safari Preferences window.
- Check the box that labelled “Show Develop menu in menu bar”.

Voila! Inspect Element is now enabled and ready to roll in Safari on your Mac.
To access this powerful tool, you have a couple of options:
- Either click on Develop > Show Web Inspector in the menu bar.
- Or right-click the page and choose Inspect Element from the context menu that appears.
Mac Inspect Element shortcut
You can also use the Inspect Element shortcut on your Mac’s Safari to access the feature more quickly. Simply select/highlight the element on a webpage that you wish to inspect and press together Command, Option, and i keys and the interface of the feature will appear.
Inspect Element on Mac Overview
Once you’ve got Inspect Element up and running on your Mac’s Safari, you’ll be able to dissect every single component of the webpage you’re working on. Here’s a quick primer on using this awesome tool:
- Adjust the position and size of the Inspect Element interface to suit your needs. Possible ways you can do hat are by docking it to the side or bottom of the page or even popping it out into a separate window.
- Customize each of the tabs in the toolbar to your liking. You’ll find tabs like Elements, Storage, and Timelines, and you’ll be able to choose which ones to be shown.
- If you’re searching for a particular item on the page, just click the search icon on the right side of the toolbar and type your search term in the box that appears.
That’s the lowdown on using Inspect Element in Safari for Mac! This incredible tool is an invaluable resource for web developers or anyone curious about how websites tick. So, go ahead and dive into code inspection, testing, and debugging like a boss. Good luck!
How to use Inspect Element (Safari)
We’ll now show you ways you can use the Inspect Elements feature in Safari and how to customize in accordance with your preferences.
First up, let’s optimize the Inspect Element interface to suit your preferences. You have the freedom to situate the tool at the bottom, along the side of the page, or even detach it into a standalone window. To achieve this, simply interact with the icons nestled in the top left corner of the toolbar. And if you desire more or less visual space, effortlessly drag the border to resize it to your liking.
With the layout tailored to your needs, it’s time to customize the tabs. Inspect Element boasts an array of nine tabs, encompassing Elements, Storage, Layers, and Timelines, among others. Feel empowered to conceal the ones you deem unnecessary by right-clicking a tab and cherry-picking the ones you’d like to keep in plain sight. This action will place checkmarks beside your elected tabs and exhibit them in the toolbar.

Eager to scrutinize an element on the page? Activate the compass icon within the toolbar, then either glide through or click the element that piques your curiosity. Alternatively, you can cherry-pick the code or item inside the tool, and it’ll materialize on the page for your convenience.
Suppose you’re on a quest to locate a specific item on the page, such as a text string. Fear not! Merely click the search icon on the right extremity of the toolbar, input your search term, and behold! Your results will materialize beneath the search box.

During your creative process, you might observe warning or error icons emerging in the toolbar. These notifications are invaluable for pinpointing issues. To delve deeper, just click on the corresponding icon.
Should you feel inspired to modify Inspect Element’s aesthetics, enable page rulers, or make use of additional features like zooming and source maps, venture to the gear icon on the toolbar’s far right. This action will unveil the settings menu, where you can make a plethora of adjustments to mold the tool to your unique preferences.
Upon completing your work with Inspect Element in Safari, simply tap the X icon in the top left corner to bid the tool farewell. And there you have it! Armed with Inspect Element, you’re now poised to elevate your code inspection, application testing, and debugging prowess to unparalleled heights. Revel in the thrill of uncovering the hidden depths of web pages on your Mac using Safari’s exceptional Inspect Element tool!
Leave a Reply