In the first installment of this Xgrid tutorial series, I introduced Xgrid and told you when to use it and how to use it. We used the Terminal to feed Xgrid, one job at a time, and ask the results back, one job at a time. In the second installment, I introduced GridStuffer, a graphical application that allowed us to submit a large number of jobs at once, and not have to worry about job submissions, grid scheduling, occasional failures and result retrieval.
In this new installment (wow, the third!), we will explore deeper aspects of job submission. The techniques presented here will probably require a little more work and more technical knowledge than using GridStuffer. However, you may need more flexibility or have other constraints (for instance, maybe you only have Xgrid access in a command-line environment). In all cases, it is useful to understand the concepts presented here, and understand what happens behind the scenes in GridStuffer or other Xgrid tools we will talk about in the future (yes, there will be more tutorials… eventually).
Just like the previous tutorial, I will assume you have downloaded and installed fasta and the DNA pieces we used in the first installment, because we will again use the same example. Also, I will assume you still remember your friend the Terminal, and your buddy Fasta.
Using the batch format
One of the things we complained about is that the basic xgrid command can only take one job at a time. For instance, to submit a fasta job that will scan chromosome X, we would type in the Terminal (all in one line):
    xgrid -job submit /Users/Shared/fasta-tutorial/fasta -q  \
    /Users/Shared/fasta-tutorial/magic-worm-gene.seq \
    /Users/Shared/fasta-tutorial/chromosomeX.fa
For the 23 human chromosomes, that means starting 23 commands. Keeping track of all these jobs is a pain. And it will become more and more challenging as you add more sequences and more genomes in your list of jobs.
Xgrid includes a way to solve part of that issue, by allowing the submission of several jobs at once and to have them all packed inside a parent job. To avoid confusion, these jobs inside a job are actually called ‘tasks’. So far, our jobs only contained one task each, which still works fine in many cases. However, being able to stack several tasks inside a job may make your life easier. For instance, we can have the 23 tasks corresponding to the 23 human chromosomes, all bundled inside one job and all submitted at once to the controller. What happens once the job reaches the controller? Well, each task becomes completely independent of the others: Xgrid will dispatch each of these individual tasks to different agents. When all the 23 tasks are completed, the job is finished and the results ready to be uploaded.
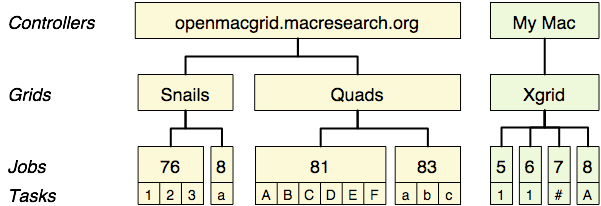
Just stop here for a few seconds and make sure that you remember this hierarchy: a controller contains grids, a grid contains jobs, a job contains tasks. Grids and jobs have a name, that you can set. They also each have a unique identifier, assigned by Xgrid (in the current implementation, these identifiers are numbers, but future implementations could use other kind of strings). Tasks also have names, that you can also choose (read more to find out how!).
Speaking the batch format
The submissions we did so far only allowed jobs with just one task. For multi-task submissions, Xgrid provides an alternate format, also called ‘batch format’, much more flexible that the single command format, but also a little more verbose. It is based on a format used all over the place in Mac OS X, called the ‘plist’ format. If you are not familiar with these technical terms, do not worry and keep reading. Just looking at the first example below, you will notice that it is simply a text file, albeit very structured, that a human can read, probably understand and even modify without too much trouble. Let’s get right down to it with a first example:

The structure is very hierarchical and very structured, and you can probably see how a computer likes to read this kind of text. The format is very picky on commas, semi-columns and brackets, but if you are careful, you should be able to easily modify it and expand it. The example above shows how you would write a batch file for one job with just 2 tasks. For both tasks, this will result in the execution of the command
/Users/Shared/fasta-tutorial/fasta
with the following 3 arguments for the first task (and similar for the second task)
-q
/Users/Shared/fasta-tutorial/magic-worm-gene.seq
/Users/Shared/fasta-tutorial/chromosomeX.fa
so this is really just the same as what we have written so far. Except using more words… To define one job with 23 tasks, one for each chromosome, we would add more tasks as is shown here (click on the link to have a look at the file, which is a bit too long to display entirely on this page).
Note how each task can be given a name. Be sure to use a different name for each. In this example, we have used task ‘chrX’ and ‘chrY’ to define the commands for chromosome X and Y, then task ‘chr1’ for chromosome 1, etc…
To help you write these specification files, there are a number of useful tricks that we will explore later, in this installment and in a future installment (well, yes, I told you, there will be more tutorials). But right now, let’s find out what to do with the file we already have.
Submitting the batch format
Once your specification file is ready, all that is left to do is to submit it. Let’s do it with our Fasta example.
- Download the specification file and save it to the Desktop.
- If you have not done so, and as described in the first installment of this tutorial, install fasta and sequence files on your machine and on the agents that you will run the calculations on.
- Finally, make sure you have a controller and an agent running on your machine, as described before, or simply download this package, and double-click the ‘xgrid-start’ item in there.
If you have all the pieces in place, all you need now is to go into Terminal and type this command:
xgrid -h localhost -job batch ~/Desktop/fasta-job.txt
See how we tell xgrid to submit a ‘batch’ job? We simply use the word ‘batch’. And we point xgrid to the batch format file on your hard drive. Just like when you submitted a single-task job, you get back a job identifier after submission is completed:
{jobIdentifier = 341; }
Your computer and the agents connected to your controller should start working on the 23 different tasks that you just submitted. While it is running, you can ask xgrid how it is doing so far by typing the following command (replace the -id value with yours):
xgrid -h localhost -job attributes -id 341

{
    jobAttributes = {
        activeCPUPower = 1500;
        dateNow = 2007-04-05 15:16:10 -0700;
        dateStarted = 2007-04-05 15:15:30 -0700;
        dateSubmitted = 2007-04-05 15:15:28 -0700;
        jobStatus = Running;
        name = "Magic gene fasta";
        percentDone = 69.56521606445312;
        taskCount = 23;
        undoneTaskCount = 7;
    };
}
When the jobStatus value is “Finished” and the undoneTaskCount is “0”, the results are ready to be harvested…
Harvesting the batch results
The command used to retrieve the results of a job submitted in the batch format is the exact same syntax as for a simple one-task-only job. In the case of our Fasta example, all our 23 tasks will have written text into the Terminal (the so-called “standard output”). We will retrieve this text with the following command in the Terminal (replace the job id with the number you got back during submission):
xgrid -h localhost -job results -id 341
You will then see all the results from all the tasks, which will quickly fill your screen: we get back a long piece of text, corresponding to all 23 chromosome scans, simply concatenated one after the other. It is then up to you to take the pieces apart and analyze this one big output! Importantly, and conveniently, the order in which the results appear correspond to the alphabetical order of the task names, except that numbers are ordered numerically. This means ‘chr2’ comes before ‘chr10’ (note that this is also how the Finder would order file names… as opposed to the Unix command /bin/ls for example).
If your tasks were producing files as output (our Fasta example does not), you would write instead:
xgrid -h localhost -job results -id 6752 -out ~/result_files/
This command will upload all the files from the different tasks that compose job 6752, back on your local machine, in your folder ~/result_files/. All the task files are put in the same folder. You thus need to make sure that each file is created with a different name for each of the different tasks. Otherwise, when you upload these files back using the command above, files with the same names will be overwritten, even if they come from 2 different tasks and are in fact different.
Exploring the batch format
If you are really serious about generating plist files for xgrid batch submission, you need tools to explore, test and understand all the options that Xgrid allows. For the official Apple reference of these options, the place to go is the xgrid man page. In the Terminal, type man xgrid, or read it here. The description of the batch format is towards the end (maybe you will want to use an alternative to the Terminal to read this man page, such as ManOpen; you could also type man xgrid > ~/man-xgrid.txt to generate a text file that you can then open in your favorite text editor).
A very basic, but very useful tool, when writing property list “by hand”, is a text editor that provides “syntax coloring” to help identify syntax errors as you type, such as the powerful and free Text Wrangler or the awesome, not free, TextMate. When writing your first plist files, start simple, test often, and add more in small increments.
A very useful trick is to use xgrid itself to generate examples of well-formed plist files. Here is for instance what you could do in the Terminal:
xgrid -h localhost -job submit /usr/bin/cal 10 2005
    {jobIdentifier = 412; }
xgrid -h localhost -job specification -id 412 > ~/Desktop/xgrid-cal-job.xml
Now, you have a fresh new file on your Desktop called ‘xgrid-cal-job.xml’, perfectly formatted and ready to be tweaked for your own purposes. In fact, the specification of any job submitted to Xgrid can be retrieved back this way (e.g. after submissions through GridStuffer).
Finally, to explore the batch format, option by option, in a more controlled environment, you could use the Xgrid Batch Editor developed by Andrew Keller. As clearly suggested by the name, this program provides a graphical user interface to edit a job specification file, or build one from scratch. A big advantage of this approach is that the nitty-gritty details of the formatting are taken care of, and you can focus on Xgrid-specific issues.
Conclusions
We are reaching the end of this tutorial. In the next episode, we will expand our Xgrid toolbox, and explore the various third-party tools that will allow you to submit multi-task jobs and to browse the results. There are many alternatives to Apple’s xgrid command-line tool, including an number of them from… Apple!
Leave a Reply